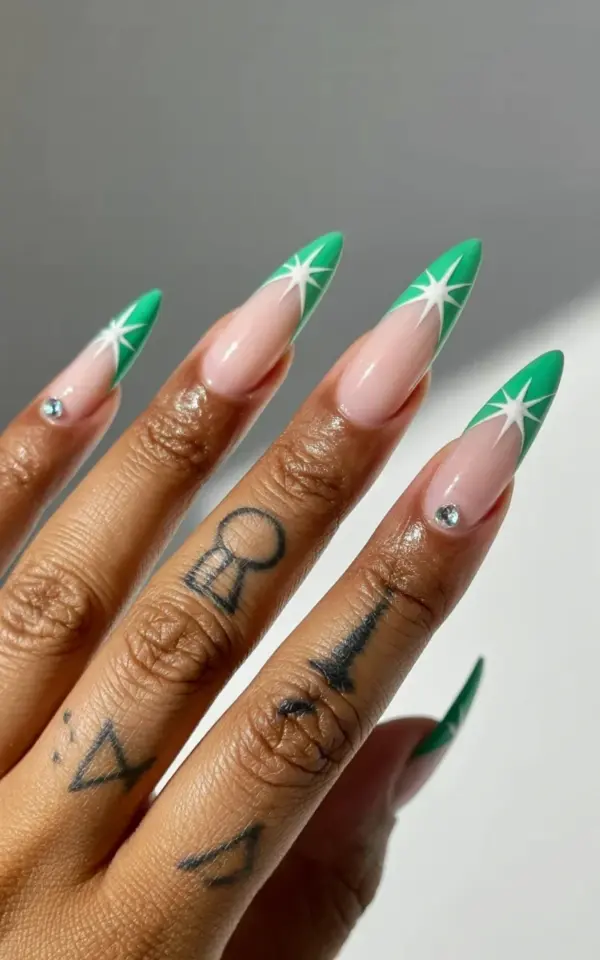
Okay so you are looking at the photo that started this whole post. Those are my actual nails, four long, pointed acrylics against a light gray background, and the manicure is a bit of a risk. It fades from a quiet nude pink at the cuticle into this shockingly bright green at the tip, and honestly, I am still not sick of looking at them. The whole design is a masterclass in how a single strong color can completely change the feel of your hand.
There are little white stars at the very end of each almond-shaped nail, and they are bright enough to catch the light. The gradient is smooth, so the color transition looks airbrushed rather than striped, and it makes the green feel much more wearable. I added small rhinestone accents near the star designs because, look, if you are going to do star nail art, you might as well commit. Keep reading if you want the full rundown on how this look works, how long it took, and exactly why it works for spring nail ideas.
What Makes the Nude to Green Gradient Work So Well
The base color is doing a lot of heavy lifting here. A plain green nail can sometimes look a little flat, but starting with pink underneath gives the whole design a softness that makes it feel intentional. Your cuticle area stays neutral and professional while the tips go wild, it is the best of both worlds.
What surprised me most was how the light mint green on the stars played against the brighter green of the gradient tips. The stars are painted in a lighter, mintier tone than the background, so they do not disappear into the color. Instead, they sit right on top like stickers, even though they are hand-painted. The gradient nails trend has been around for a while, but this specific combo of nude pink and green feels fresh for spring.
Should You Try This at Home or Hit the Salon?
Here is the thing, we all have that one friend who says “I could totally do that myself” and then ends up with gel polish on their cuticles. This design is absolutely doable at home, but it requires a few specific tools and a steady hand. You will need a makeup sponge for the gradient effect, two creme polishes, a fine liner brush, and a bit of patience.
If you are new to acrylic nails, I would honestly recommend letting a professional do this one. Getting the apex right on a long, pointed nail takes practice, and no amount of YouTube tutorials will replace the feeling of a properly applied acrylic overlay. I have been doing my own nails for two years now, and I still went to a salon for this set because I wanted that crisp, clean cuticle line.
The Color Combo: Nude Pink, Bright Green, and Mint Stars
Let me break down the exact palette because it is doing something clever. The nude pink is warm, almost beige, so it blends with your skin tone and makes your fingers look longer. The bright green is cool and saturated, which creates a lovely contrast against the warmth of the pink.
The stars are painted in a light mint green that is somewhere between the two colors. This is the trick that makes the whole design cohesive. If the stars had been stark white, they would have clashed with the bright green tips. Using mint instead ties the whole gradient look together.
A few things to know about the art:
– The stars are placed at the very end of the tip, not in the middle of the nail
– Each star is small, around the size of a sesame seed, so they look delicate
– The rhinestones are tiny crystals, not big chunky gems, placed just below the star
– One nail has two tiny stars instead of one, which adds a little asymmetry
How Long Does This Manicure Actually Take?
This is the part nobody talks about, so I will. Getting this exact look on a full set of acrylics took me two hours and eleven minutes at the salon. The sculpting of the pointed tips took the longest, probably forty-five minutes, because the nail tech had to make sure every nail was the same length and shape.
The gradient application itself was surprisingly quick. It is just ten light coats of color blended with a sponge, then a top coat to smooth everything out. But the stars, those little buggers, took a while because they are so tiny. My nail tech used a thin brush and had to stop constantly to clean it. The rhinestones were faster, just a bit of gel glue and they were set.
Why Star Nail Art Works Best on Almond Shoulder Shapes
I have seen star decals on square nails and they always look a bit cramped. The star needs room to breathe, and a pointed or almond tip gives it that space. When the nail tapers to a point, the star sits at the narrowest part, which makes the whole nail look longer and more elegant.
The rhinestones act as a visual anchor. Without them, the star might look like it is floating aimlessly. With them, the design has a starting point and a clear focal area. The combination of negative space at the cuticle and busy details at the tip creates a balanced composition that is very pleasing.
Quick Tips for Keeping This Manicure Fresh All Spring
Long, pointed acrylic nails are high maintenance, and I am not going to pretend otherwise. The shape is delicate and you will accidentally poke yourself in the eye at least twice in the first week.
– Wear gloves when doing dishes, hot water will loosen the acrylic
– Avoid using your nails as tools, this includes opening soda cans
– Apply cuticle oil every single morning to keep the nail bed hydrated
– The rhinestones will catch on sweaters, so be careful with knit fabrics
– Book a fill after two weeks or the growth gap will ruin the gradient effect
The best part about this design is that it hides wear well. Because the tips are already bright green, any minor chips at the edge are barely noticeable. I have had this set for nine days now and they still look freshly done, which is basically a miracle for acrylic nails.
Is This the Right Spring Nail Idea for You?
If you are someone who usually sticks to nudes and pastels, this is a gentle way to experiment with color. The nude base keeps it classy while the green tips add that playful spring energy. If you are normally a dark colors person, this will feel a little different, but in a good way.
The pointed shape is not for everyone, I will be real about that. If you type on a keyboard all day for work, long stiletto nails will drive you absolutely insane. You will make mistakes, click the wrong keys, and miss the spacebar. But if you are willing to adapt your typing style, you get a stunning result.
For the spring season, green is honestly the color that will get you the most compliments. It pops against pastel clothing and neutral outfits alike. I wore a beige sweater to brunch and the green tips were all anyone could talk about.
The Upkeep Is Real but the Payoff Is Worth It
Let me be totally honest about the maintenance. You will spend more time looking at your hands than is probably healthy. Every time you wash your hands, you will admire the gradient again. You will catch yourself flexing your fingers just to see the stars move.
That is the point of nail art, really. It is a small, contained form of self-expression that costs less than a night out and lasts much longer. This design got me so many compliments, including a weirdly long conversation with my grocery store cashier who wanted to know if the stars glowed in the dark. They do not, by the way.
So, would you try this green? Save this idea for your next manicure and maybe take a slightly bolder color choice than you normally would. If you are going to do star nails, you might as well do them in a color that makes you smile every time you look at your hands. I know I do.
Leave a Comment