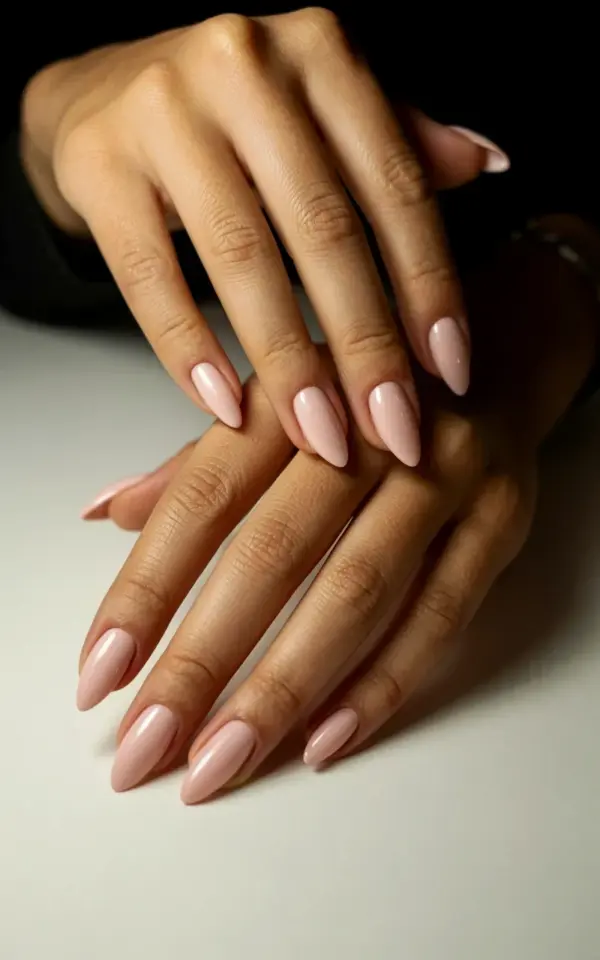
Alright, here’s a fairly honest opinion: most “nude” nail polishes look like congealed milk on my skin tone. Finding the right one genuinely took a while. This almond shaped nails in nude pink situation is a full vibe though, and once I got the formula right, I basically stopped looking at salon menus. Because this is a budget-conscious guide, real options only, no $60 bougie kits here. Grab a coffee, let’s talk about the finest DIY manicure of your life.
## Why Almond Nails And Nude Pink Make The Perfect Combo
Almond nails make your fingers look longer. Straight up, the tapered shape pulls the eye downward, and that subtle point tricks everyone into thinking your hands are more elegant than they actually are. I am here for any optical illusion that requires zero plastic surgery.
Adding a glossy nude pink polish softens the whole look. It’s not stark like a white tip and the gel just melts into your actual fingertip, creating this seamless, clean extension. Honestly, the shape does the heavy lifting here, the color just needs to sit there and look expensive. You get that polished, “I have my life together” aesthetic without wearing anything loud. Or anything that makes you look like you work at a very glamorous crime scene.
## The “Almond Illusion” For Beginners (Don’t Skip This)
Ok so the biggest mistake? Filing your nail straight across and hoping it looks almond. It doesn’t. You end up with a squoval that got confused halfway through.
To get that almond point, you have to attack the sidewalls. That’means filing from the middle of the nail edge toward the center point, or you will absolutely ruin the balance and it will look like a wonky triangle. The trick is to look at your fingertip from the top, not the side. You want an even curve on both the left and right side meeting at a soft apex. It should mimic an actual almond nut, but longer, like the photo reference where the nails extend beyond the fingertips with that glossy finish.
Don’t go filing back and forth like you’re sawing a branch. Use long, single-direction strokes. It prevents the nail from peeling, and it gives you way more control over that silhouette.
## Selecting A Nude Gel Polish On A Budget (Salon Dupes)
You don’t need a ten-dollar bottle of gel polish. I have found some absolute gems at the drugstore, and they last just as long when I prep my nails right. Look for shades with a pink base rather than a beige or yellow base, especially if your skin has warm undertones. The aim is to blend with your natural nail bed for that “my nails but better” effect.
Here is a quick list of what to keep an eye out for when shopping:
– Check the brush size (a thin brush helps you get closer to the cuticle line, but a wide brush is faster if you’re impatient like me).
– Go for a shade that is slightly milkier than your exact skin tone, a semi-sheer look covers imperfections better.
– Avoid anything with too much shimmer or pearl, you want a glossy, glass-like finish, not glitter.
– Look for “one-coat” formulas so you save time and product.
– If the budget is super tight, get a white polish and a drop of pink to mix your own custom nude. Weird but it works.
I once spent an entire evening mixing a peach toned polish with a tiny dot of red to match my sister’s skin tone because the store was sold out. She still thinks I’m a wizard. I’m not a wizard, I just have too much time and a weird obsession with matching colors.
## The DIY Gel Manicure Process, Step By Step
You don’t need a salon light? Wrong. You do need an LED lamp for the polish to actually harden, but the good news is you can get a mini lamp for less than the cost of one salon visit. That lamp pays for itself the second time you use it.
– **Prep your nails:** Push back the cuticles with a wooden stick. Do not cut them excessively, that hurts.
– **Buff the nail bed:** Just a light buff, enough to remove the shine. This stops the polish from peeling off in one weird sheet later.
– **Apply the base coat:** This needs to be thin. Seriously, wipe off half the excess polish on the brush before application.
– **Cure for 30 seconds:** Rotate your hand under the lamp to ensure the whole nail gets hit with the UV, otherwise you get a soft spot.
– **Paint the nude color:** Start with a thin, even layer. Two thin coats beat one thick, goopy coat any day of the week. Let it self-level for a second before curing.
– **Cure again:** Check the edges of your nails, make sure there is no polish on your skin. That will lift later and ruin your day.
Look, I get impatient during the curing time. I have a habit of tapping the lamp with my finger while it runs, as if that speeds up the chemistry. It doesn’t. I just look restless.
## Glossy Top Coat Secrets To Seal The Nude Finish
The final top coat is your best friend. A high-shine top coat transforms a semi-matte nail polish into that glossy, wet-looking finish seen in the image. Again, the photo shows that perfect, mirror-like shine, and you can absolutely replicate that at home.
Here is a secret: apply the top coat *thicker* than the color coat. You want it to wrap over the nail edges to cap the tip, a step called “capping.” This prevents chips and adds that thick, juicy dimension that makes you want to tap your nails on your desk all day. I tap my nails on my desk all day. Please don’t do it in a quiet library, people get annoyed.
Also, try to apply the top coat in one or two sweeping strokes. Re-brushing it once it starts to set will leave brush marks, and you lose the perfect glassy finish.
## Maintenance Tips To Extend The Life Of The Nude Manicure
If you are on a budget, you want this manicure to live forever. Do not use your nails as screwdrivers. I am looking at you, person who broke a nail opening a can of soda. I have absolutely done that, and I felt a deep sense of personal betrayal afterward.
Wear gloves when washing dishes. Water seeps into the edges and softens the gel over time, causing lifting. Also, keep your cuticles moisturized with a good oil. When your cuticles are dry and peeling, the whole manicure looks rough, no matter how shiny the nude pink polish is.
I find that touching up the edges with a tiny brush and some nail polish remover keeps the line looking sharp for longer. It’s a minimal effort, maximum gain routine.
## A Personal Note On The “Nude Pink” Fit
Your nude is your nude. The definition of “nude” changes drastically depending on your melanin levels. If you have a deeper skin tone, you might find that pale pink looks chalky. In the photo used here, the warm medium-dark skin is perfectly complemented by that milky pink tone, it looks soft, not washed out. It’s all about finding that sweet spot between your natural nail color and your fingertip flush.
Do not be afraid to look ridiculous in the drugstore swiping testers up and down your finger. I have swiped shades onto my nails in four different stores before settling on the one I actually wanted. The staff probably thinks I’m a shoplifter or a germaphobe. I promise I’m just a girl looking for a cheap gel manicure that doesn’t look cheap.
So, ready to commit to the almond shape? It’s a great way to use up that old gel polish you have lying around and save your cash. Skip the salon, fire up your lamp, and give your nails that glossy nude update. Want more affordable nail ideas? Browse the rest of the site for your next at-home mani plan.
Leave a Comment