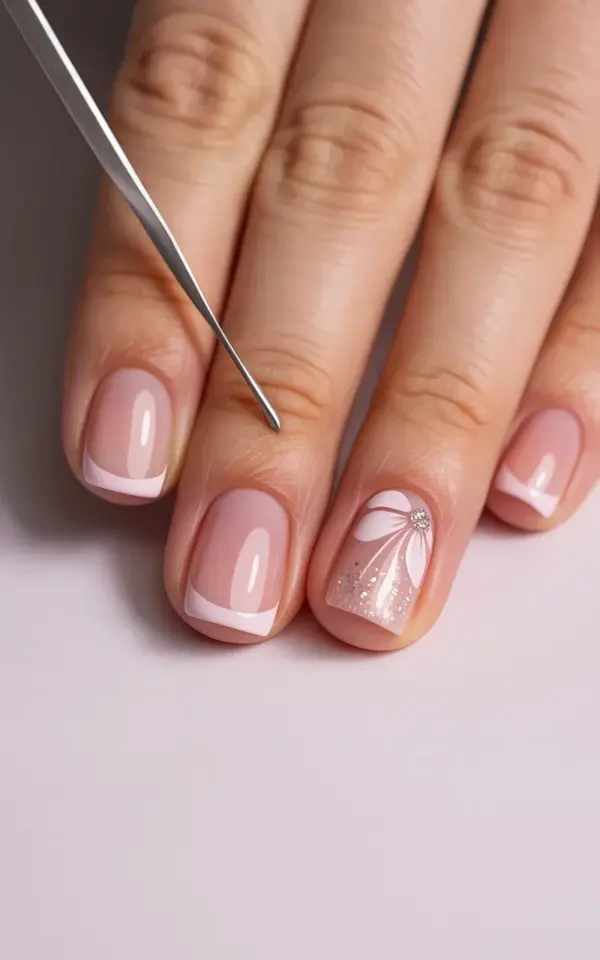
So you have seen that soft pink gradient manicure with the delicate white flower and glossy finish floating around Pinterest, and you want it without emptying your wallet. I am talking about budget pink gradient nails with a French tip and flower design, the kind that looks like it took an hour at a fancy salon but actually costs pocket change. Here is the thing: I have tried this look about seven times, and I have made every mistake you can possibly make. Like the time I used a kitchen sponge. No joke. It left little holes in my polish. Anyway, let me save you from my own disasters. I am going to walk you through the common pitfalls and how to dodge them, so your DIY nail art actually looks like the photo. Honestly, it is easier than you think once you know where people screw up.
You Are Skipping the Base Prep (And Wondering Why Your Gradient Looks Muddy)
Biggest rookie move? Slapping on a gradient over bare, bumpy nails or old polish. The pink gradient needs a smooth, clean canvas or the colors just bleed into each other like a watercolor gone wrong. I used to think one coat of base coat was enough. Not true. You need to push back cuticles, lightly buff the surface, and wipe away dust. Then apply a thin layer of a sticky base coat. Wait. Let it dry completely. That small extra step makes the sponge application glide instead of drag. Remember: a messy base means a messy gradient, no matter how cheap your tools are.
And for the love of your sanity, do not use a thick ridge-filling base coat under a gradient. It creates bumps that the sponge picks up, and then your pink gradient looks like a textured mess. Thin and even is the goal.
The Sponge Trick That Almost Everyone Gets Wrong
Ok so the photo shows a thin silver nail art tool being held over the nails. That tool is for dotting and detailing. But the heart of this look? A cheap makeup sponge. Here is the mistake: people use a dry sponge or soak it too much. I have done both. A dry sponge soaks up all the polish and barely deposits color. A soaking wet sponge dilutes the polish and leaves blobby streaks. The sweet spot? Dampen the sponge slightly with water (or a drop of nail polish remover if you are brave), then squeeze out every single drop until it is just barely moist. Then dab your pink and white polish stripes onto the sponge, dab the sponge onto the nail, and lift straight up. No dragging. No wiggling. Just a soft bounce.
Another pro tip from my many failures: use a separate small piece of sponge for each nail. Do not reuse the same one for all ten fingers unless you want muddy colors. They are cheap. Cut a big sponge into tiny squares, use one per hand if you must, but fresh is better.
Your French Tip Is Wobbly Because You Are Using the Wrong Brush
Look at the photo again. The nails are square-shaped with a crisp white French tip. To get that clean line without a perfect freehand, you need a thin brush, not the polish wand. The mistake most people make? They use the brush that comes with the white polish. That brush is too thick for a precise tip. Instead, grab a cheap thin striping brush or a nail art liner brush. Dip it in the white polish, wipe off excess on the bottle rim, and paint a thin line across the tip. Start in the middle, then sweep to the sides. If you mess up? Do not panic. Dip a tiny flat brush in acetone, clean the edge, and try again. It is forgiving if you act fast.
Here is a weird thing I learned: do the French tip after the gradient, not before. If you do the tip first, the sponge can smear the white when you add the pink gradient. Sequence matters. Gradient first, let dry, then tip, then flower.
The Flower Design Looks Lopsided (And the Dotting Tool Is Still in the Photo for a Reason)
The index finger in the photo has a delicate white flower with glitter accents. People see that and think, oh, I will use a dotting tool and draw five dots. But then the flower ends up looking like a crushed daisy. The mistake? Not planning the center dot first. Here is what works: use the dotting tool to place a small white dot where you want the center of the flower. That becomes your anchor. Then add five evenly spaced dots around it, each one touching the center. That gives you a symmetrical petal layout. Then go back with a tiny brush or dotting tool to add a bit of glitter or a tiny yellow center dot.
And please do not use a thick white polish for the petals. It will blob. Use a thin nail art paint or a polish that is slightly runny. If it is too thick, add a drop of thinner. Yes, thinner is your friend for tiny details.
Honestly, the flower is the easiest part to fix. If it looks off? Let it dry, dip a dotting tool in acetone, and gently erase just that petal. Touch up with top coat later.
You Are Ruining the Gradient with a Harsh Top Coat (Here Is the Fix)
I did this so many times. Applied a thick layer of quick-dry top coat and watched my soft gradient bleed into a single pink blob. The mistake is using a top coat that is too aggressive with solvents. Instead, use a gentle, slow-drying top coat (like a gel-effect one) and apply it with a light hand. Do not press the brush into the nail. Let the bristles barely skim the surface. And for the flower? I learned to let the top coat dry just a little bit tacky before applying it over the flower design, otherwise the brush can drag the petals.
If you want high gloss like in the photo, go for a top coat that is labeled “high shine” but not “fast dry.” Fast dry formulas are the ones that smudge art. Trust me on this. My bathroom drawer is full of failed top coats.
The Nail Shape Is Fighting Your Design
The photo shows square-shaped nails. That is not random. Square nails work beautifully with a French tip because the flat edge gives you a straight line to follow. If your nails are round or almond, the tip curve is trickier to line up. I tried a round shape with this exact design and the gradient looked weirdly cut off. So if you really want the photo result, file your nails into a soft square. You do not need long nails. Short squares work too. Just make sure the corners are smooth, not sharp, so the red-brown transition from pink to white is clean.
Also, a quick aside: the skin around the nails in the photo is fair and well-maintained. You can cheat this by applying a thin layer of liquid latex or tape around the nail before you sponge. That way when you mess up the gradient on the skin, you peel or wipe it off cleanly. I use plain old school glue. Works like a charm.
Why Your Manicure Chips Before You Even Take a Photo
You did everything right. Gradient, tip, flower, top coat. Then twelve hours later the tip is chipped. The mistake is not capping the free edge. Every single layer, from base coat to color to top coat, needs to be painted over the edge of the nail. That micro-layer seals the polish. I know it sounds fussy, but it is the difference between a manicure that lasts three days and one that lasts a week. Especially on the French tip, which is on the very edge where wear happens first.
Another common chipping cause? Using cheap nail polish that is too thick or too old. Look, I am all for budget nails, but if your polish is separated and goopy, it will never bond properly. Shake it well. If it is still lumpy, buy a new bottle. Dollar store polishes work great when fresh.
One last thing: wait two minutes between each coat. Not thirty seconds, not five minutes. Two. Set a timer if you have to. Patience is the cheapest tool in your kit.
So next time you see that gorgeous pink gradient with the flower on Pinterest, you know exactly where to not slip up. Start with a smooth base, damp sponge, precise tip technique, gentle top coat, and a little patience. You have got this. Go make your nails look fancy without the fancy price tag. And if you mess up? So what. It is just polish. Try again.
#budgetnails #pinkgradient #frenchtipnails #diynailart #affordablenails
Leave a Comment