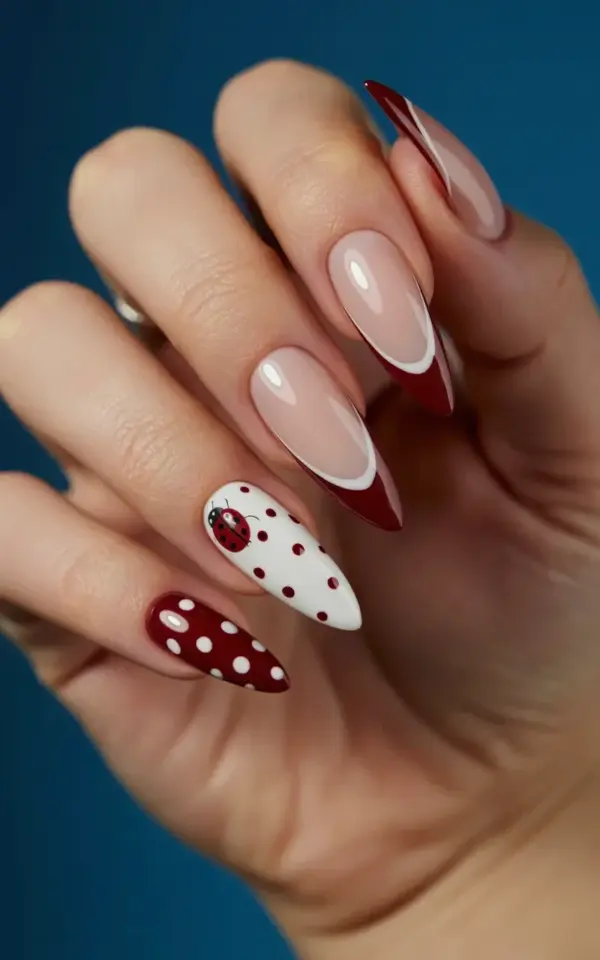
Three in the morning, and there I was, scrolling nail inspo with a mug of cold tea, when this exact manicure stopped me dead. The black and white photo alone made me screenshot it, but the real magic is in the details you almost miss. It’s a cozy fall nail idea that somehow feels both dressed-up and totally wearable. If you’re planning to take this to your nail tech, or you’re just collecting ideas for October, let’s talk about the burgundy tips, the white dots, and that absolutely tiny ladybug sitting on the middle nail.
Look, nail trends come and go, but this specific combo is a keeper. Stiletto nails give you that dramatic length, while the burgundy and nude palette keeps things seasonally appropriate without screaming Halloween. And the ladybug? It’s the kind of detail that makes people grab your hand in the grocery store to get a closer look. I’ve seen a ton of fall nail ideas, but this one holds up because it balances a classic French tip base with a playful accent. Here’s how to get it right, and more importantly, what mistakes to avoid so you don’t walk out of the salon disappointed.
Mistake #1: Requesting a “Burgundy Tip” Without Being Specific
Saying “burgundy tips” is like saying “I want food” at a restaurant. It’s a starting point, but you’re leaving way too much up to interpretation. Stiletto acrylic nails need a crisp, clean line where the burgundy meets the nude base. If your nail tech freehands this, you might end up with a wavy edge. You need to specify you want a sharp smile line or a precise half-tip placement.
Here’s the thing: this photo shows a tip that sits pretty high on the nail, covering maybe a third of the total length. That creates a modern French look, not the old-school thin sliver at the edge. Be super clear about the ratio. You want the burgundy to start around the widest part of the stiletto and then taper down to the point. Ask them to use a striping brush or a stencil. A steady hand matters, obviously, but a stencil is your safety net for that perfect arch.
Mistake #2: Choosing the Wrong Nude Base for Your Skin Tone
The nude polish underneath the design is doing a lot of heavy lifting. It’s not just a blank canvas; it’s the foundation that makes the burgundy pop or fall flat. A pinky-beige nude looks stunning against darker skin, while a peachy-nude works better for fairer complexions. Acrylic nails mean you can customize the color right on site. Don’t just point at the display. Ask to see the acrylic swatches against your actual hand.
Warm burgundy tones need a warm base. Cool burgundies need a neutral or cool nude. If you mix a blue-based burgundy with a yellow nude, you’ll get a murky, muddy transition line. Honestly, 90% of the reason this design fails for people is the base color mismatch. I once watched a woman get an olive-nude base with a wine-red tip, and it looked like she had bruises under her nails. Don’t be that girl. Test the color before they start mixing.
Mistake #3: Over-Scaling the Polka Dots
Polka dots are cute. Bold, chunky polka dots on a stiletto? They take the design from cute to cartoonish really quick. In the photo, the dots are tiny, like peppercorns, and they’re spaced out with room to breathe. On the ring finger, the burgundy dots sit on a white base. On the tips, the black speckles (or are they tiny dots? hard to tell) add texture. Polkanails require restraint.
If your nail tech uses a dotting tool that’s too large, the dots will overwhelm the narrow taper of the stiletto shape. You want multiple sizes, randomly placed, not evenly spaced soldiers. Asymmetry makes it look organic and hand-drawn, not stamped on. I always ask for a smaller dotting tool than I think I need. You can always add more, but you can’t easily un-add a gigantic dot.
Mistake #4: Making the Ladybug Too Big or Too Realistic
The ladybug in the image is described as “tiny,” and that is the entire secret. It sits on the middle finger nail, which has a white base. If you make the ladybug the size of a thumbnail, it looks like a toy stuck on your nail. It should be a small, delicate detail. You want it to look like a little jewel or a hand-painted miniature.
Also, don’t overcomplicate the bug. A perfect red circle, a black line down the middle, and two tiny black dots for the head. That’s it. Avoid adding too much detailing or trying to make it look 3D with heavy gel. It should feel like a secret detail for people who get up close. If you’re not a skilled painter, ask the tech to use a fine liner brush. Or, bring your own tiny nail decals. Ladybug decals are surprisingly reliable and look just as cute.
Mistake #5: Ignoring the Stiletto Shape Proportions
Not all stiletto nails are created equal. Some are extremely long and wickedly sharp, perfect for a villain aesthetic. Others are shorter, blunter, and more practical. This particular design leans into a medium-long length. The point is sharp enough to be sexy, but the shape isn’t so extreme that the burgundy tips look stubby.
The placement of the burgundy color actually shortens the appearance of the nail optically. If you have super long nails and cut them at a 45-degree angle, the color block can feel heavy. Go for a more gradual taper. Let your nail tech know you want a “gentle stiletto,” not a weapon. The goal is for the white dot details on the tips to sit on a surface that’s wide enough to actually see them. If the tip is too razor-thin, the dots just look like slivers.
Mistake #6: Turning the Base of the Middle Nail into a Confetti Party
Let’s talk about that middle nail. It has a white base with red polka dots, and then the ladybug. This is your statement nail. It breaks up the pattern. If you have the burgundy tip design on the index and pinky, and the burgundy base with white dots on the ring finger, the middle finger needs to be the odd one out to tie it all together.
Do not put polka dots on every finger. Do not put a ladybug on every finger. The beauty here is the intentional contrast. The ring finger is the inverse of the tips. The middle finger is the inverse of the ring finger. It’s a delicious chain reaction of patterns. Keep the base of the middle finger white and clean. Let the dots and the bug be the stars, otherwise you get visual noise. Trust the spacers, let the negative space work for you. This is the main component of fall nail ideas for a reason.
Mistake #7: Using Matte vs. Glossy Without a Plan
The photo shows a glossy finish. That gloss is what makes the white dots look crisp and the burgundy look juicy. A matte finish would completely kill the aesthetic. It would suck the life out of the red accent colors. So step one is easy, use a high-shine top coat.
But here’s the mistake people make with the top coat. They glob it on, which can smudge the tiny dots. Make sure your nail tech caps the free edge (paints the tip of the nail) to prevent chipping, and let them dry thoroughly. Stiletto nails are heavy at the tip. If the top coat isn’t sealed, you’ll get chips within the week after the wedding. Ask for a non-wipe top coat if they’re using gel. And for the love of all things holy, use cuticle oil every single day to keep the edges looking clean. These acrylic nails are a maintenance project, not a set-and-forget situation.
Mistake #8: Forgetting the Everyday Practicality
Long, pointed nails are beautiful. They are also terrible for picking up coins, pressing elevator buttons, and texting your best friend without stabbing the screen. If this is your first time with stilettos, consider starting a touch shorter than you think you want.
You have to be honest with yourself about your lifestyle. Are you a contact lens wearer? Good luck. Do you type all day for a living? You’ll adapt, but there’s a learning curve. I once shredded a brand new sweater with my index finger stiletto. Just completely ruined it. The word “careful” will become your middle name. It’s a sacrifice for beauty, sure, but knowing what you’re signing up for helps. You don’t want to have to cut them off three days before your vacation because you can’t button your jeans. The practicality matters more than the Instagram photo.
There’s also the seasonal aspect. Burgundy works in October, sure, but it also carries you into November and even December. The key is focusing on the deep red and keeping the white elements for airiness. It’s the perfect bridge between summer brights and winter glitter. Stilettonails are a full-time commitment to drama, but with these exact shades, they feel almost cozy. Like a chunky scarf or a hot apple cider kind of vibe.
So, as you head to your next appointment, go with a clear vision. You want the nude base to match your skin, the burgundy to be a rich oxblood runner, and the dots to be finer than you think they should be. Keep that ladybug small and sweet. It’s the tiny details that keep this art from feeling gimmicky. Don’t let anyone upsell you on charms or rhinestones because this design doesn’t need them. It’s already perfect.
I rebuilt my whole morning routine around protecting my nails from the shower curtain, and you will too. It’s a small price to pay for a hand that looks this good. If you try this look, come back and tell me how it goes. I have a feeling this is about to be the most requested design of the season, and you’ll be the trendsetter before anyone else catches on. Enjoy the ladybug vibes, they’re pure luck, after all.
Leave a Comment