The Most Common Mistakes With Fruit French Tip Nails (And How to Fix Them)
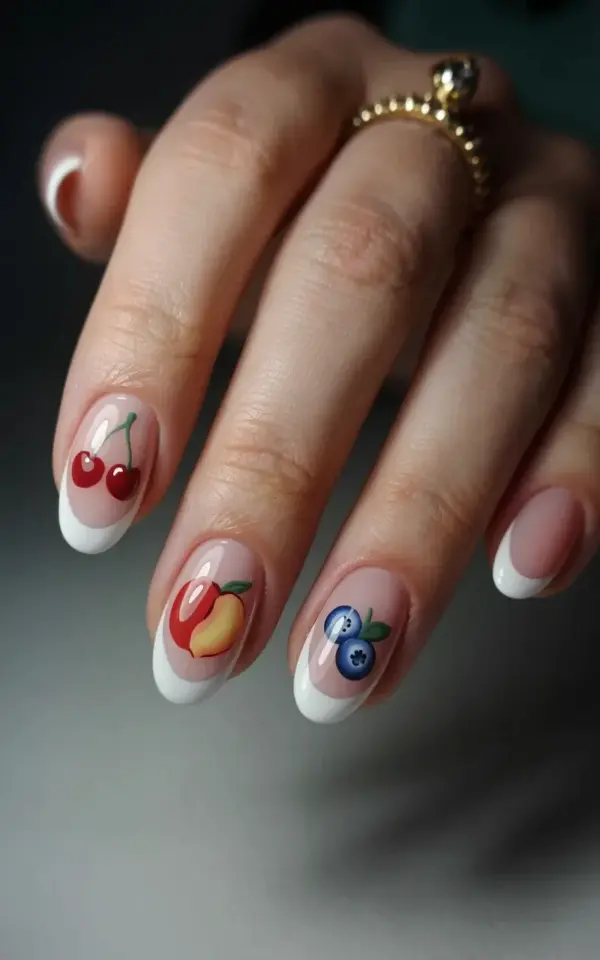
Nothing says playful summer style quite like fruit nail art, and the cherry, peach, and blueberry French tip look has been popping up everywhere. I’ve seen so many nail photos online, including one that shows long pointed oval acrylic nails with a soft pink base, crisp white tips, and a different fruit on each accent nail. It’s a gorgeous concept, and you absolutely can recreate it at home. But I’ve also noticed the same handful of mistakes keep ruining the final result for people. Let me walk you through the most common pitfalls and exactly how to avoid them so your fruit French tips turn out as fresh as the photo.
Picking the Wrong Nail Shape for Fruit Details
The pointed oval shape in the reference photo is a smart choice because it gives you a long, smooth canvas. Many people try to squeeze fruit art onto short square or round nails, and the details end up cramped or awkwardly placed. The cherry, peach, and blueberry motifs need a bit of length and a tapered tip to look natural and elegant.
Stick with a pointed oval or almond shape for fruit French tips. If your nails are naturally short, consider using tips or full acrylics. The extra surface area lets you place the fruit slightly below the white tip, which keeps the design balanced. You don’t want the fruit touching the cuticle or spreading over the white edge.
Choosing Colors That Clash Instead of Complement
A soft pink base is the standard for a reason. It provides a gentle, skin-friendly backdrop that makes the bright cherries, peachy orange, and deep blueberry tones pop. A common mistake is using a base that’s too warm or too cool, which makes the fruit colors look muddy or disconnected. Also avoid going too opaque with the base; a sheer or semi-sheer pink lets the natural nail show through, giving a more polished finish.
For the fruit itself, pick true, saturated colors. Cherry red should lean slightly cool (like a real Bing cherry), not tomato red. Peach should be a soft pastel orange, not neon. Blueberries work best in a rich navy or deep purple, and adding a tiny white highlight gives them dimension. Test your polish colors side by side on a swatch stick before you paint.
Overcrowding the Design With Too Many Fruits
One fruit per accent nail is plenty. The photo shows a cherry on the index finger, a peach on the middle finger, and blueberries on the ring finger. That leaves the thumb and pinky clean or with a simple white tip. When you try to put fruit on every single nail, the design becomes noisy and loses its French tip elegance.
Keep the fruit minimal. If you want to include more, pick one nail for a larger fruit cluster and leave the others with just a tiny accent, like a single cherry or a couple of blueberries. Remember, the white tip itself is already a strong element. Let the fruit breathe.
- Limit fruit art to 2 or 3 nails at most.
- Reserve the thumb and pinky for a plain French tip or a tiny fruit detail.
- If you love all three fruits, rotate them across hands (cherry on left index, peach on right middle, etc.).
Skipping the Base Coat and Top Coat Essentials
Fruit nail art involves multiple colors and tiny details, which means more layers and more risk of chipping. I see people skip a ridge-filling base coat because they think it’s optional. That’s a mistake. A proper base coat smooths the nail surface and helps the polish adhere, especially on acrylics. Without it, the white tip and fruit details may lift or crack after a few days.
For the top coat, use a glossy no-wipe gel top coat if you’re using regular polish (and a lamp) or a quick-dry glossy top coat for air-dry. Apply two thin layers. Wait for each layer to dry fully before adding the next. The photo shows a high-gloss finish that makes the soft pink base look juicy. You need that shine to mirror the freshness of the fruit.
Forgetting to Balance the White Tip With Fruit Details
In a classic French tip, the white edge is crisp and even. But when you add fruit, the white tip can look disconnected if it’s too thick or too thin. A common error is making the white tip the same width on every nail, even on the accent nails where the fruit will go. That often pushes the fruit too far down toward the cuticle or forces it to overlap the white.
On the accent nails (cherry, peach, blueberry), make the white tip slightly thinner than on the other nails. Aim for about one-third of the nail length on accent fingers, and a slightly thicker smile line on the plain nails. This gives the fruit enough room to sit just below the white curve without feeling cramped. The cherry stem and leaves can cross the white edge a tiny bit, but the fruit itself should stay on the pink base.
Using the Wrong Fruit Placement for Each Nail
Placement matters more than you think. The photo places the cherry on the index finger, peach on the middle, and blueberry on the ring finger. That is not random. The index finger is the most visible and playful spot for a cherry. The middle finger gets the peach because it is the longest nail and can handle a larger, round fruit. The ring finger, where the gold ring sits, features blueberries, which appear as a cluster of small dots. This creates a natural flow.
Do not reverse the order randomly. If you put blueberries on the index finger, the small dots may look lost. If you put a big peach on the pinky, it will overpower the nail. Match the fruit size to the finger length. Cherries and blueberries work well on shorter or narrower nails, while a peach needs more width and length. Also consider your jewelry. A ring on the ring finger draws attention to that nail, so a delicate cluster of blueberries (or a single cherry) complements the metal without competing.
Rushing the Application and Ending Up With Smudges
Fruit art requires patience between layers. I have lost count of how many times I rushed the white tip and then wiped it off while adding the cherry stem. Use a thin brush for the white tip and let it dry completely before moving to the fruit. For the fruit details, use dotting tools or a fine detail brush. Start with the fruit base color, let it dry, then add the stem, leaves, or highlights.
If you smudge a line, do not panic. Dip a tiny brush in acetone and clean up the edge. Better to fix it right away than cover it with more polish. For the blueberries, three small dots in a cluster with a tiny white dot on each gives that realistic look. The photo shows a cluster of about four or five blueberries on the ring finger, each with a white highlight. That takes a steady hand, but a dotting tool makes it far easier than a brush.
Final Thoughts and Next Steps
Fruit French tip nails are one of those designs that looks complicated but is very doable when you take it step by step. Focus on the shape, the color balance, and the placement. Keep the rest of the manicure simple, and do not skimp on the base and top coats. The result will look just like that Pinterest photo: soft pink, crisp white, and playful fruit that feels both cute and classy.
Save this guide for your next appointment or home session. If you try any of these tips, share a photo of your own cherry, peach, and blueberry nails. I would love to see how they turn out.
#FruitNailArt #FrenchTipNails #SummerNails #AcrylicNails #CuteNailDesigns
Leave a Comment