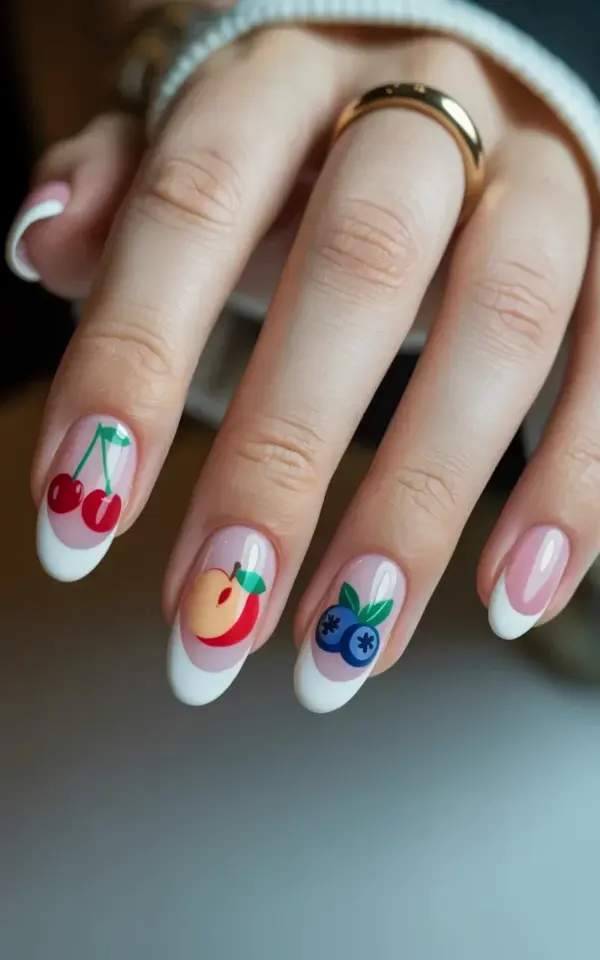
I love a good fruit nail art design as much as the next person, but paying salon prices every time? Not gonna lie, that hurts. This DIY cherry, peach, and blueberry French tip manicure lets you get that same playful look on long almond acrylics for pennies. Soft pink base, crisp white tips, and fruit accents that actually look like fruit. The photo that inspired this post shows exactly that: pointed oval nails, each with a different fruit theme, a gold ring on the ring finger, and a dark background that makes the colors pop. I’ve made every mistake in the book trying to recreate this at home, so let’s skip the frustration and get straight to what actually works.
Mistake #1: Choosing the Wrong Base Color (How to Pick the Perfect Pink for Fruit Nail Art)
You want that soft pink base you see in the photo. Not bubblegum pink, not neon coral. A pale, milky pink that’s almost nude but still reads pink. Honestly, I’ve tried using a bright pink thinking it would look “fun,” and the fruit just vanished into the background. Terrible idea. The white French tip also looked muddy. Stick with a sheer jelly pink or a dusty rose. It keeps the focus on the cherry, peach, and blueberry details. Here’s the thing: if you don’t have the exact shade, mix a drop of red with a clear base coat. Done. One bottle costs a dollar at the drugstore.
Mistake #2: Skipping Nail Prep (The Real Reason Your DIY Fruit Nails Chip in Two Days)
You rush. I get it, we all do. But skipping prep is the number one reason your fruit nail art peels off before you’ve even taken a photo. Push back your cuticles. Lightly buff the nail surface. Wipe with rubbing alcohol. It’s boring, it’s annoying, but it’s the difference between a manicure that lasts a week and one that lasts an afternoon. The long almond acrylics in the photo hold up because the base is prepped right. Look, you don’t need fancy dehydrators. A quick swipe of acetone right before you paint works. Seriously. That’s it. Don’t skip this step unless you like redoing the whole thing.
- Buff lightly – not aggressively, you’re not sanding wood.
- Push cuticles – a cuticle stick is fine, don’t cut them.
- Wipe with alcohol – removes oils, no bubbles under polish.
- Base coat is non-negotiable – prevents staining from the darker fruit colors.
Mistake #3: Using the Wrong Brush (How to Paint Tiny Fruit Details Like a Pro)
Ok so the biggest rookie error? Using the brush that comes inside the polish bottle. That thing is a mop. You can’t paint a tiny peach half or a cluster of blueberries with a fat wedge brush. I learned this the hard way and ended up with cherries that looked like blobs of ketchup. Go buy a cheap nail art brush set online. For a few bucks you get a thin liner brush and a dotting tool. That’s all you need. For the cherry in the photo: two small circles with dotting tool, then a thin line for the stem. For the peach: a crescent shape using a liner brush, then a tiny leaf. For the blueberries: three little circles clustered together, each with a tiny star dot on top. Practice on a piece of paper first. I do it while watching TV. It’s weirdly soothing.
Mistake #4: Overloading on Details (Why Simpler Fruit Nail Art Actually Looks Better)
Here’s a tangent: I once tried to add a whole strawberry, a slice of kiwi, and an apple on the same nail. It looked like a fruit bowl exploded on my finger. Not cute. The photo shows one fruit per nail, and that’s the smart move. Cherry on index, peach on middle, blueberry on ring. Keep it simple. If you want a matching accent nail, maybe a tiny single blueberry on the pinky. But don’t crowd the design. The white French tip needs room to breathe. Otherwise the whole thing looks messy and amateur. Remember: the pink base and white tip are doing most of the heavy lifting. The fruit is just a wink.
Mistake #5: Forgetting the Top Coat (How to Seal Fruit Nail Art So It Lasts)
You painted those tiny blueberries. They’re perfect. Then you skip the top coat because you’re impatient. And by the next day, the peach leaf has rubbed off. I’ve been there. It’s infuriating. Use a thick, glossy top coat. Not a quick-dry one (those shrink and can smudge the design). A gel-effect top coat gives that shiny, juicy look you see in the photo. Apply one layer, wait two minutes, apply a second layer. Yes, two. This seals the fruit details and makes the white tip pop. Plus it adds to that “salon finish” without the salon price. And if you’re like me and you bump your nails against everything, the extra layer saves you from crying over a missing cherry.
Mistake #6: Not Matching the Fruit Shape to Your Nail Shape (Especially on Almond Acrylics)
Long almond nails are the canvas in the photo. They have a natural curve that follows the nail. If you try to paint a round peach dead center on a wide square nail, it looks off. The proportions don’t work. On almond nails, place the fruit slightly off-center, toward the cuticle or the side. The white tip takes up the top third, so the fruit sits right below it. For the blueberry cluster, angle it so the little dots follow the curve of the nail. For the cherry, let the stem curve along the nail’s side. It’s subtle, but it makes the design look intentional. I messed this up on my first try and my blueberry looked like it was falling off the edge. Not a good look.
Mistake #7: Rushing the Dry Time (And Why Your Fruit Accents Smudge)
You paint the peach. It’s flawless. Then you immediately reach for your phone. And then you have a peach with a fingerprint in it. Patience, my friend. Wait three minutes between each step. White tip, dry. Pink base, dry. Fruit dots, dry. Top coat, dry. I set a timer on my phone. It’s annoyingly disciplined but it works. If you’re in a hurry, use a fast-drying spray or a fan. But honestly, the best trick is to paint one hand at a time. Do your left hand, then your right. That way you’re not smudging while you paint. The photo nails are crisp and clean because every layer had time to cure. Don’t rush the fruit or it’ll look like jam.
So there you go. Seven mistakes I’ve made so you don’t have to. The cherry, peach, and blueberry French tips in that photo are totally doable at home for a fraction of the salon cost. Soft pink base, white tip, tiny fruit details, and a whole lot of patience. Grab a cheap brush set, a couple of nail polishes, and give it a shot. Even if your first cherry looks a little weird, it’s still a cherry, right? Try it out and let me know how your fruit nails turn out. I’d seriously love to see them.
#fruitnailart #diynails #frenchtipnails #budgetnails #nailartideas
Leave a Comment