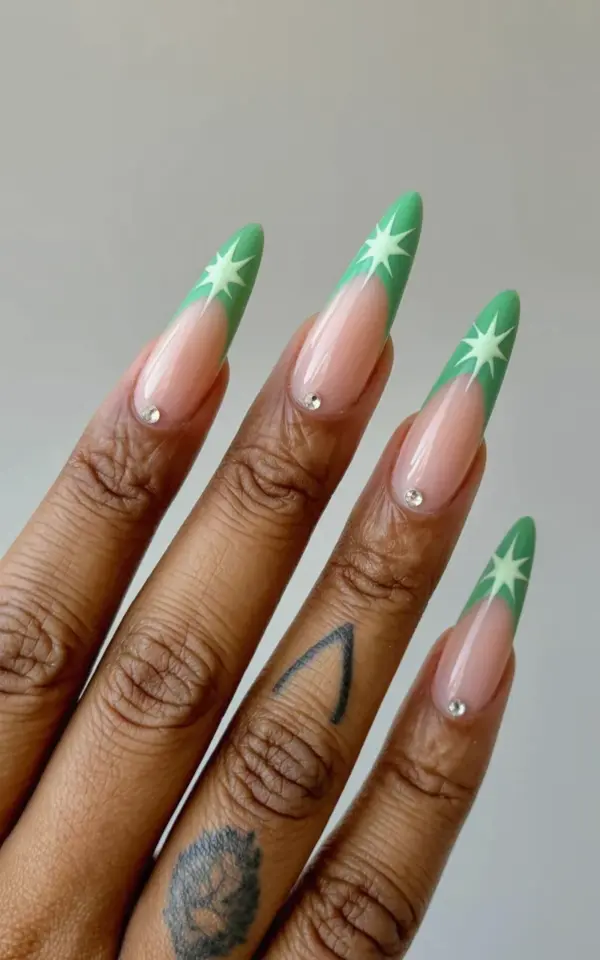
If you love pointed acrylic nails with gradient designs, there is one mistake I see over and over again, and honestly it makes me want to grab a nail file and fix it myself. People place star decorations way too close to the cuticle, or they overcrowd the tip until the gradient barely gets a chance to breathe. I get the impulse more is more, but here’s the thing with gradient nails the whole point is the shift of color. So keep your stars at the very end, just like in the photo I’m looking at now: four long almond shaped nails painted in a gradient from nude pink to bright green, with light mint green stars resting right at the tips and a couple of tiny rhinestones sparkling nearby. That arrangement lets the gradient show through perfectly. And it makes your nails look intentional, not like you ran out of space. Save this for your next salon visit or DIY session.
The Stealthiest Mistake With Pointed Acrylic Nails (And How to Fix It)
Here is what happens when you get excited about star decals. You slap one right above the cuticle, thinking it will look cute. Then you add another star near the middle, and maybe a third at the side. Suddenly your gradient is a mess of clutter. The color transition gets swallowed by the design. I learned this the hard way after a disastrous set where I placed three glitter stars directly over the fade line. It looked like a toddler had been let loose with a sticker pack. The fix is simple: treat the cuticle area as sacred negative space. Let the nude pink base breathe there. Then place your stars only at the very end of the nail tip, right where the bright green gradient is strongest. This creates a natural focal point. The eye travels from clear skin, to soft pink, to vivid green, and then lands on the star. Perfect.
Why Star Nail Art Belongs at the Tip (Not the Base)
Gradient nails are all about illusion. You want that seamless fade from one color to another. When you put a star near the cuticle, you break the visual flow. The star becomes a hard stop. But when you place it at the tip, it works as a cap, a tiny exclamation point at the end of the color journey. Look at the nails in the photo I am describing: each tip has a single minty white star, centered or slightly offset, with one or two rhinestones right beside it. That’s the sweet spot. No crowding. The gradient shows through because the star only covers the last ten percent of the nail. I swear by this rule now. It also makes the nails look longer, because the eye follows the gradient down to the star and stops there, instead of bouncing around the middle.
Rhinestone Nails Done Right A Tiny Sparkle Philosophy
Rhinestones are powerful little things. A single misplaced one can ruin the whole set. But placed correctly? They add just enough bling without screaming for attention. For this particular design, the photo shows two or three small rhinestones near each star, not scattered all over. That is key. If you spread them across the entire nail, the gradient loses its gentle vibe. I once made the mistake of covering a gradient with rhinestones from base to tip. Not gonna lie, it looked like a disco ball had exploded. So now I keep them clustered near the star, like a constellation. And I always use the smallest size, maybe 1.5 millimeters. Anything bigger dominates the slim shape of pointed acrylic nails. Honest advice: buy an assortment pack and test sizes on a practice tip before glueing anything permanent.
Gradient Nails Color Combos That Work Like Magic
The photo uses nude pink to bright green, which is a gutsy combination. I love it. But you can adapt this star and rhinestone setup to other gradients too. Here are a few that I have tested and loved:
- Peach to coral with gold stars and champagne rhinestones. Very warm and summery.
- Lavender to deep plum with silver stars and clear rhinestones. That one feels moody and elegant.
- Baby blue to turquoise with white stars and iridescent rhinestones. Ocean vibes, perfect for vacation.
- Nude to cobalt blue with tiny star decals and a single large rhinestone per nail. Bold but not chaotic.
- Blush pink to sage green with mint stars and pearlized rhinestones. This one is very similar to the photo but softer.
Notice a pattern? The star and rhinestone colors should complement the darker end of the gradient, not fight it. In the photo the mint green stars echo the bright green tip. That is why it looks cohesive. Also, do not be afraid to mix star sizes. One large star with two micro stars can create a cute cluster, but again, keep it at the tip.
How to Apply Tiny Rhinestones Without Losing Your Sanity
Ok so here is a real struggle. I have terrible hand tremors when I try to place rhinestones. I once spent an hour fiddling with a single stone, only to sneeze and lose it under the couch. Never again. The trick is to use a wax pencil or a dotting tool dipped in nail glue. Dab a tiny speck of glue where you want the rhinestone (not on the stone itself), then pick up the rhinestone with the wax pencil and drop it onto the glue. Press gently with a silicone tool. Wait, there is another issue: if you use too much glue, it oozes out and ruins the gradient. So less is more. Literally a spec. Also, apply a thin top coat over the entire nail before placing the stones, then seal everything with a non wipe top coat after curing. This prevents lifting. And here is a weird personal detail: I always do my rhinestone application sitting on the floor because my desk chair has wheels and I roll away mid placement. Just me? Probably. But the point is find a stable surface and good lighting. Your gradient deserves that care.
The Best Base Shades for That Seamless Green Gradient
The photo shows a nude pink base that fades into bright green. But not all nude pinks are created equal. If your base is too pale, the green will look harsh. If it is too warm, the transition might turn muddy. I personally use a sheer milky pink as the base, then sponge on a high pigment bright green from the middle to the tip. Sometimes I add a thin strip of white at the very tip before the green to give the gradient extra pop. That trick is a game changer. For the star itself, the photo shows light mint green stars on the bright green tip. This works because the star is a lighter shade of the same color family. If you were using a hot pink gradient, gold stars would look better. If you are doing an ombre from black to silver, use holographic stars. The goal is harmony, not contrast. So when you pick your colors at the salon or at home, hold the star decal next to the darkest gradient color. If they clash, switch it up.
Final Seal and Wear Tips for Long Lasting Gradient Nails
You spent time on these pointed acrylic nails with gradient stars and rhinestones. Do not let them chip in three days. I always apply two layers of a good quality gel top coat, making sure to encase the edges of each star and rhinestone. Then I cure thoroughly. But there is a catch: the top coat can settle around the rhinestones and create a bump if you are not careful. So after curing, I use a fine grit buffer to gently level the surface around the stones. This prevents snagging on hair and clothes. Also, avoid using your nails as tools. I know, obvious. But I have seen people open soda cans with their gradient set, and it breaks my heart. Keep a cuticle oil handy to maintain the skin around the nails, because dry cuticles make even the prettiest gradient look sloppy. And if one rhinestone falls off, do not panic. Just reapply with a drop of glue and top coat. No one will notice.
Look, pointed acrylic nails with a gradient star design are stunning when done right. The biggest lesson I want you to take away from all this rambling is simple: let the gradient breathe. Keep the stars at the tip, add a couple of tiny rhinestones nearby, and do not clutter the cuticle area. That little spacing makes all the difference between a salon quality set and a messy experiment. Try it on your next nail appointment or DIY session. And feel free to screenshot this article and show your nail tech. They will appreciate the clear instructions. I promise.
#acrylicnails #gradientnails #starnailart #rhinestonenails #pointednails
Leave a Comment