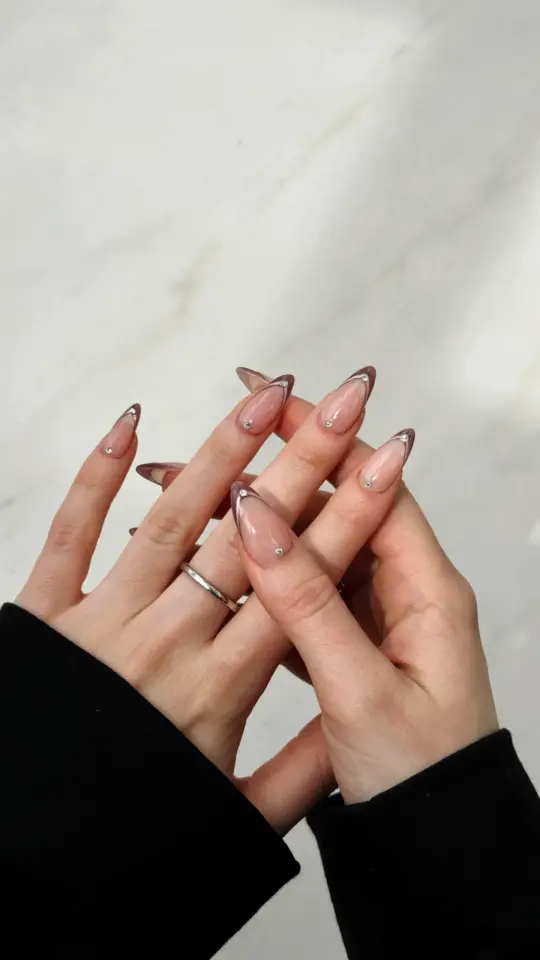
I get it. You’ve got a Pinterest board full of glossy, glassy nails that look like they cost a hundred bucks, but your bank account says otherwise. I’ve been there too. The Douyin and Korean acrylic nail trend is everywhere, and honestly, it feels unfair that the coolest nail art always seems to require a professional hand and a fat tip.
Look, I’m not a nail tech. I’m a girl who got tired of dropping forty bucks on salon sets only to have them lift within a week. So I started recreating those viral looks with cheap press-ons and dollar store gems. Ok so, let me show you exactly how to get the expensive Korean look without leaving your kitchen table.
Start With the Right Press-On Base, Not Fancy Acrylic
The biggest secret to the viral Korean nail look is the shape. It’s not really about the product being real acrylic, it’s about the silhouette. You want that long, tapered almond or a sharp stiletto. Most drugstore press-on kits are too round or too short, so you have to dig a little deeper to find the good stuff.
Amazon sells these “coffin” or “ballerina” press-on sets in bulk for about eight dollars. Get the clear ones. I’m talking about the full-cover tips that come in a pack of 50 with different sizes. They look janky at first, but once you file the cuticle area flat and apply them correctly, they look like a private salon did them.
You also need to spend time on the fit. If a press-on is too small, it pinches. Too big, and it looks like a plastic spoon. File the sides gently to match your natural nail bed. It takes an extra five minutes per nail, but this is the difference between looking like you have press-ons and looking like you have acrylics.
The Douyin Color Game: Milky Pinks and “Juicy” Translucents
The color is where the Korean beauty vibe really comes alive. Forget the harsh neon gels and the opaque reds. The viral trend is all about the “milky” finish. Think of a sheer white, a translucent baby pink, or that weird “skinny dip” nude that looks like your nail but better.
When you are shopping at the dollar store, look for polishes that are clearly jelly formulas. If you can see the brush through the bottle, it’s perfect. If you only find opaque polishes, don’t stress. Just mix a drop of the color with a drop of clear top coat on a piece of foil. That instantly gives you a sheer, glass-like tint.
Honestly, the color placement matters more than the brand. Apply one thin coat, let it dry for a minute, then apply another. The layering creates that depth that makes cheap polish look like Japanese or Korean gel. It’s all about the build, not the pigment.
Boujee Details Without the Price Tag: Foil and Gems
Here’s the thing about the Douyin look: it loves a “dewy” 3D effect. We aren’t doing flat stickers here. We are talking about little pearl beads, tiny silver studs, and micro gems that catch the light. You can buy a mixed pack of these on Shein or Temu for literally two dollars.
For a truly high-end look, invest in some “aurora” or “dichroic” nail foil. This stuff comes in little sheets. You press it onto a tacky base coat and it leaves a holographic, shimmery streak that looks like expensive chroming. I got a pack of 20 sheets for three bucks, and I’ve used it on three sets already.
When you apply the gems, don’t just plop them in the middle. Place one tiny pearl at the base of the nail near the cuticle, and then sprinkle a few micro studs toward the tip. It creates a scattered, “artistic” look. Also, use a pair of tweezers, not your fingers. Your oily skin will make the gems lose their stick instantly.
The “Liquid Glass” Top Coat Trick That Saves Everything
You can have the cheapest polish in the world, but a thick, glossy top coat will make it look like gel. It’s non-negotiable. The secret is to buy a “gel-effect” top coat, not the regular drugstore quick-dry. The thick viscosity is what fills in the ridges and creates that rounded, jelly bean shape.
Apply it heavily. Like, swipe on a thick layer that you think is too much. It will level itself out as it dries. Then, here is the weird trick: set your hands under a bright LED lamp for about two minutes. It won’t cure the polish, but the heat helps it settle into a perfect, dome-like shine.
Do not touch anything for twenty minutes. I know you want to text back, but trust me, the moment you press your nail against a screen, you’ll leave a fingerprint in the wet top coat. And that ruins the entire glass effect.
How to Make Them Last Longer Than a Weekend
The biggest complaint with press-ons is that they pop off during the week. Usually, it’s because people skip prep. You have to file the surface of your natural nail lightly. Just scuff it up. Then, wipe it with rubbing alcohol to get all the oil off. No oil means better stick.
Do not use the glue that comes with the cheap kits. Throw that tiny tube of clear goop in the trash. Go out and buy a brush-on nail glue specifically called “beast mode” or “maximum hold.” Alternatively, use the sticky tabs. But you have to be careful with the tabs, they are great for a one-night event, terrible for a week at work.
When you apply the press-on, angle it at 45 degrees at the cuticle, and swipe it down over the natural nail. Push out all the air bubbles. You want it to sit flush with your cuticle. If there’s a gap, water gets in, and that’s where bacteria grows. Not cool. Also, re-apply a quick topcoat to the tips every other day. It seals the edge and prevents lifting.
The 30-Minute Routine (My Exact Process)
Ok so, to save you the trial and error, here is exactly what I do when I sit down to do a set. It takes about half an hour, mostly because I let things dry properly.
– **Prep:** Push back cuticles, buff the shiny layer off the nail, and wipe with alcohol.
– **Pick and Fit:** Choose the right size for all ten fingers, jot down the sizes, and file the edges if needed.
– **Attach:** Apply the glue to the natural nail and the press-on. Press firmly for 30 seconds.
– **Color:** Paint one layer of a milky pink all over the full nail.
– **Detail:** Smudge on some aurora foil with a makeup sponge, add the minimal gems.
– **Seal:** Paint a thick layer of the gel-effect top coat over the entire thing. Done.
One thing I always do that you might think is weird: I put a matte top coat on one accent nail. It looks crazy good against the glossy ones. It gives a very high-fashion, editorial vibe that’s popular in the Seoul fashion week scene right now.
What to Skip and What to Splurge On
To keep this on a serious budget, you need to know where to cut corners. Don’t waste money on branded press-ons from the beauty supply store. The generic brands are the exact same material, just without the logo. Save your cash for the top coat, since that is the product doing the heavy lifting.
Also, skip the individual expensive craft store gems. The makeup aisle at Dollar Tree has little containers of nail decorations that are totally fine, but you will have to dig for the good ones. You might have to buy three bags to find the pearls that aren’t weirdly yellow. That’s the budget tax, I guess.
My final unpopular opinion? The cheap nail polish smells stronger. So do this in a well-ventilated room. Or just crack a window, otherwise, you’ll be huffing chemicals and wondering if the headache is worth having cute nails. It is worth it, but still, open the window.
Getting that specific Korean glass look is really about the technique, not the expensive gel system. Once you master the jelly layering and the thick top coat, nobody will ever know you paid a dollar for those tips. Go ahead and create your own nail artist profile on Instagram with the finished mani, you’ll get the likes, and you didn’t even break a twenty.
I hope this guide saves you the money and the headache! Leave a comment below telling me which nail shape you’re trying first, and don’t forget to pin this for your next lazy Sunday.
Leave a Comment