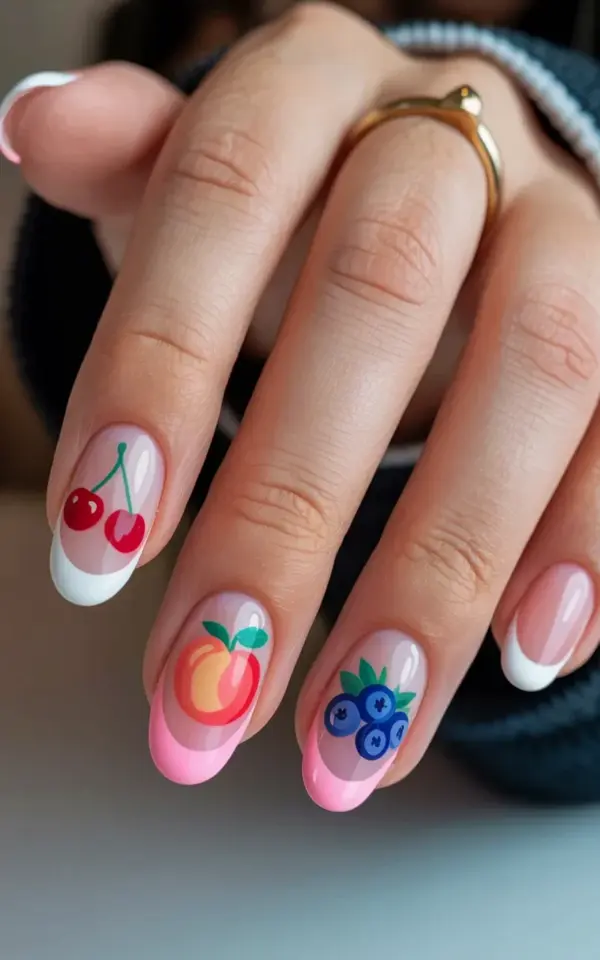
By the time June rolls around, I’m usually staring at my plain nails and feeling like they’re wearing last year’s outfit. So when I saw this cherry, peach, and blueberry French tip set, I honestly stopped scrolling mid-thought. It’s the perfect mix of classic manicure structure and playful summer fruit, and the soft pink base makes it feel wearable instead of costume-y.
The photo that inspired this whole guide shows long, pointed oval acrylics with a glossy pink base and crisp white tips. Each nail has a different fruit: a cherry on the index finger, a peach on the middle, and blueberries on the ring finger. A gold ring catches the light on the ring finger, which is a tiny detail that makes the whole look feel more styled.
If you want to recreate this look or something close to it, here’s the step-by-step process. I’ve broken it down so you can either hand it to your nail tech or try it at home with press-ons.
Start With the Right Nail Shape for a Fruit French Tip Design
The nail shape in the photo is doing a lot of heavy lifting. Long, pointed oval tips give the fruit designs room to breathe, and they make your fingers look longer in the process.
Truthfully, the pointed oval shape isn’t for everyone. It can be annoying to type with, and it catches on everything if you’re not used to it.
- Stiletto: sharper, more dramatic, very “main character energy.”
- Almond: slightly wider, more practical for daily tasks, still gives you canvas space.
- Round: cute but too small for detailed fruit art on shorter nails.
- Coffin: trendy, but the flat tip can make fruit look squished if you’re not careful.
If you’re getting acrylics, ask for a sculpted almond or stiletto shape. The key is having enough width near the middle of the nail so the fruit art doesn’t feel cramped.
The Base Color and Glossy Finish Matter More Than the Fruit Art
Here’s the thing: a soft pink base is what makes the whole design feel cohesive. It’s not a stark neon pink or a milky white. It’s somewhere in between, almost like a nude pink with a hint of warmth that compliments every skin tone.
The gloss factor matters too. In the photo, the finish is glassy. That shine makes the fruit look like it’s sitting on a little candy shell, which is exactly the vibe you want for summer.
The process for your base is simple:
Apply two thin coats of a sheer pink gel polish. Let each coat cure fully. And if you want that extra-smooth finish, wipe the sticky layer off with alcohol before doing the fruit details.
Painting the Cherry Nail: Tiny Details Make the Difference
If you’re only going to do one fruit, cherries are the easiest to start with. They read clearly from a distance and don’t require steady hands for complicated shapes.
For the cherry nail in this design, the nail artist painted two small red circles near the tip of the nail, right below the white French line. A tiny green stem curves upward from the top of each cherry, with a small leaf that has a slightly darker green vein down the middle.
Honestly, the secret to cute cherries is the highlight. A tiny white dot on the upper left corner of each cherry makes them look glossy and juicy, not flat. Use a dotting tool for this, not a brush, because you want perfect little circles.
And here’s a practical tip I learned the hard way: paint the fruit details after the white tip is completely cured. If you try to paint over wet polish, everything smudges and you’ll be starting over.
How to Get That Peach Nail Looking Soft and Realistic
Okay so the peach is the hardest fruit of the three. In the photo, the middle finger has a peach that looks soft and almost watercolor-like, not overly saturated.
The artist used a peach-orange shade but kept it muted. It’s not a bright citrus orange. It’s more like the color of a ripe peach that’s been sitting in the sun, warm and slightly pink.
To recreate this, you want to build the color in thin layers. Start with a pale orange, then add a slightly deeper peach shade to the bottom half of the fruit. Blend the edges gently with a clean brush so there’s no harsh line.
Here’s a mildly odd detail I’ve noticed: fruits look more realistic when you don’t outline them. If you draw a thick black or even dark brown outline around the peach, it suddenly looks like a cartoon sticker. Instead, let the color shape the fruit and only add a subtle darker line at the very edge.
Finish the peach with a small leaf at the top and two short curved lines to suggest the crease where peaches naturally split. The leaf in the photo is a soft green, almost sage, which keeps the whole nail soft rather than loud.
Blueberry Clusters Look Best When They’re Imperfect
The ring finger in this design has two blueberries, not a single one. This asymmetry is actually what makes the whole set feel organic and hand-painted.
Blueberries are simpler than they look. Draw a small round circle in a dusty blue-purple shade, add a tiny five-point star pattern on top (that’s the little crown at the end of a real blueberry), and finish with a small white highlight.
But don’t make the circles perfectly round. Real blueberries are slightly irregular, and that imperfection makes the design feel more like art and less like a decal.
One thing I noticed in the photo is that the blueberries aren’t placed exactly on the tip. They’re slightly lower, closer to the middle of the nail. That gives the French tip room to remain visible, and it balances the design better.
If you’re doing this at home and your hand is shaking, drink some water and rest your pinky finger on the table for stability. It sounds ridiculous, but it genuinely steadies the brush.
How to Pair Fruit Nails With the Right French Tip Thickness
The white French tip in the photo is on the thinner side. It follows the natural curve of the nail and stays consistent across all fingers. It’s not a chunky block tip, which is good. Thick tips on long nails can look bulky and dated.
For a summer fruit look, I recommend a tip thickness between 1/8 and 1/4 of an inch. Thin enough to keep the nail looking elegant, but thick enough that you can clearly tell it’s a French manicure.
Also consider the color of your white. Pure white can look stark against a pink base. I prefer a soft white with a hint of cream, which blends more naturally with the base color and the fruit tones.
And here’s a practical wearability question: you’re going to get so many compliments that you’ll want to keep these on for three weeks. That’s fine, but wrap the tips with gel polish to prevent chipping at the free edge. Just wipe the top of the nail with alcohol before sealing it.
What You Need to Know Before Booking Your Appointment
If you’re taking this photo to a nail salon, call ahead to confirm your artist is confident with hand-painted details. Some techs are great with solid colors but freeze up when you ask for fruit art.
Ask if they use gel polish for the details or acrylic paint. Acrylic paint is actually the secret weapon for nail art because it stays where you put it and doesn’t shrink as you work.
Also bring a reference photo. Yes, you can just show them this article or the original Pinterest pin. But a close-up from two angles is even better, so they can see exactly how the fruit sits on the nail.
Bring your own cuticle oil after they finish. It makes the whole set look more polished and keeps the skin around your nails soft, which is important when you have long acrylics that can dry your cuticles out.
The total time for this kind of set is usually around 90 minutes to two hours. The fruit details add time because each nail needs to be painted separately and cured if you’re using gel.
Don’t be afraid to ask your tech to adjust the fruit placement. Maybe you want the peach on your ring finger instead of the middle finger. It’s your nail bed, and the design should feel personal to you.
So the next time you’re scrolling through summer nail ideas, keep this cherry peach blueberry combo in your folder. Whether you get long pointed acrylics like the photo or a shorter almond shape, the combination of glossy pink, clean white tips, and tiny fruit paintings is going to carry you straight from beach days to rooftop dinners without feeling out of place.
Leave a Comment