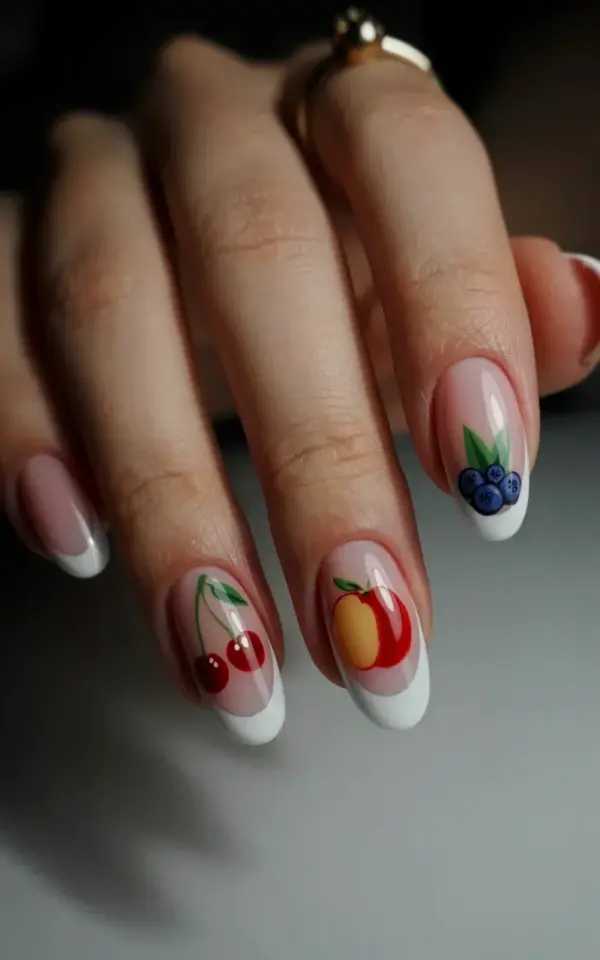
Look, I’m not a nail tech. I’m just someone who gets bored with plain polish and refuses to pay fifty bucks for a set that chips in three days. So when I saw those fruit french tip nails all over summer nail inspo boards, I knew I had to try them. And honestly? Doing a fruit french tip nails on a budget is way easier than it looks. Each nail in this set has a different fruit – cherries on the index, a peach on the middle, blueberries on the ring – and they’re all done with acrylics and a classic white tip. The photo above shows my actual hand: long pointed oval acrylics, soft pink base, glossy finish, dark background, and that gold ring on my ring finger that I somehow never take off. Not gonna lie, I was shocked they turned out this cute.
Here’s the thing: you don’t need a salon kit or a hundred tiny brushes. You just need patience, a few basic supplies, and a willingness to accept that your first cherry might look like a slightly lumpy red circle. That’s fine. We’re going for cute, not perfect. So grab your acrylic powder, your white polish, and a snack (I recommend actual fruit, for moral support), and let’s break this down nail by nail.
Cherry Nail Design on a Budget – Index Finger Tricks
The index finger in my set is the cherry nail. Two red circles, a tiny green stem, and a white tip above it all. I used a cheap dotting tool from a five-dollar Amazon set, but honestly, a toothpick or the tip of a bobby pin works just as well. Paint the white tip first, let it dry completely, then add two dots close together near the cuticle side of the tip. I used a bright red acrylic paint (not nail polish – it’s thicker and easier to control) and a little green for the stem. One curve, that’s all. If you mess up, just wipe it off with acetone and try again. No big deal.
A weird little aside: I actually burned my thumb on a hot stove the day before I did these nails, so the index finger on my other hand is a bandaged mess. But the cherry finger? Perfect. That’s the one that gets photographed. Anyway.
Peach French Tip – The Middle Finger Star
Ok so the peach nail is probably my favorite. It’s more subtle than the cherry, which is good because the middle finger always gets the most attention. You paint the white tip, then add a small peach-colored half-circle just below the tip line. I mixed a tiny bit of orange acrylic with white to get that soft peachy tone. Then I added a tiny green leaf on top of the peach shape and a little pink blush dot on the side. It looks so fresh and summery.
One thing I learned the hard way: don’t make the peach too big. Leave room for the white tip to be visible. Otherwise it looks like a weird orange blob on a white field. You want the fruit to sit below the white line, not cover it up. The photo shows it exactly – the peach sits halfway down the nail, the white tip stays crisp at the top.
Blueberry Nail Art – Ring Finger Details That Pop
Blueberries are the easiest fruit to paint, I swear. On the ring finger (the one with the gold ring in the photo), I painted three small blue circles clustered together. Each circle is a single dot from the dotting tool. Then I added a tiny white dot on top of each blueberry – that little highlight makes them look round and fresh. A short green stem at the top of the cluster, done. No blending, no shading.
- Use a dark navy or blueberry blue acrylic paint, not pastel blue. Pastel looks like baby shower decorations, not fruit.
- Let each dot dry before adding the white highlights, or they’ll smudge into a blurry mess.
- If you want to match my set exactly, put the blueberry cluster close to the tip but still below the white line. Leaves a nice gap of pink base.
Honestly, this nail got the most compliments. People couldn’t believe I did it myself with a dotting tool. I didn’t tell them I used a dried-out ballpoint pen for one of the dots because my tool was lost in the couch cushions. Whatever works.
Classic White French Tip – The Foundation You Can’t Skip
Before you even think about fruit, you need a solid white french tip. And I don’t mean a perfect line – I mean something that looks intentional. If you’ve never done a white tip before, here’s my method. Paint the whole nail a soft pink or nude acrylic (I used a milky pink powder). Then, instead of trying to freehand a perfect curve, use a curved sticker or a piece of tape as a guide. Position it just below the tip, paint the white over the edge, peel off the sticker before it dries. Boom. Clean line.
This is the part where most DIY tutorials lie and say “it’s so easy!” It’s not. Your first few will be crooked. But here’s the secret: once you add the fruit on top, nobody notices a slightly uneven white line. The fruit draws the eye. So don’t stress.
Budget Nail Supplies – What Actually Works
I spent about twenty dollars total on this set. Not on the whole set, but on the supplies that will last for a dozen more designs. Let me break it down for you because I hate when people tell you to buy expensive monomer.
- Acrylic powder kit from a drugstore brand – twelve dollars. Includes pink, white, and clear.
- Small acrylic paint set from a craft store – four dollars for eight colors. Way better than nail polish for tiny details because it dries matte and doesn’t run.
- Dotting tool set (three sizes) – two dollars on a clearance rack. Or free if you use a toothpick.
- Top coat – whatever cheap glossy topcoat you have. I used a five-dollar one from a beauty supply store. It works fine.
That’s it. No UV lamp, no gel, no special brushes. Just patience and a podcast in the background. I recommend a true crime one, because the suspense makes the drying time feel shorter.
Summer Nail Ideas – Why Fruit Works for Hot Weather
Summernailideas are everywhere right now – neon stripes, seashells, sunset gradients. But fruit is different. Fruit nails look cute when they’re fresh and even cuter when they start to fade a little. The white tip might yellow after a week, but the fruit stays bright. Also, fruit colors (peach, cherry red, blueberry) naturally complement a suntan. I wore these to a barbecue and someone asked if they were custom press-ons. Nope, just me, a dotting tool, and a lot of caffeinated determination.
One last thing about the photo – you’ll notice my nails are long and pointed oval. That shape works best for fruit designs because the tip has enough surface area to fit a whole blueberry cluster without crowding. If your nails are shorter, just make the fruit smaller or place them higher up. It still works.
So here’s the bottom line. You don’t need a salon. You don’t need talent. You just need a steady hand, cheap supplies, and the willingness to redo a cherry three times until it looks like a cherry and not a raspberry that gave up. I love how my set turned out, and honestly, I’m already planning a lemon-and-lime version for next month.
If you try these fruit french tip nails on a budget, tag me or save this post – I’d love to see your versions. And if your peach ends up looking like a potato? That’s art. Own it. 🍑
#fruitnails #frenchtipnails #diynailart #budgetnails #summernailideas
Leave a Comment