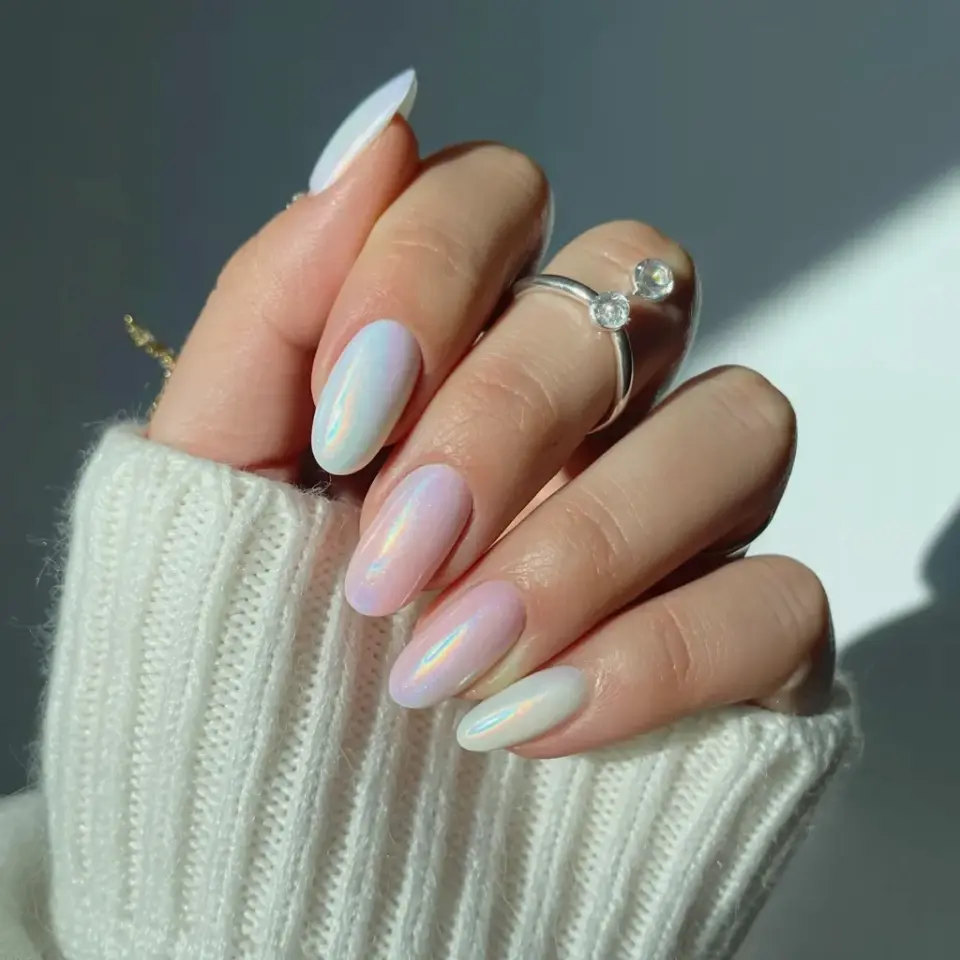
There’s something about iridescent ombre nails that feels almost magical, like the polish caught a piece of moonlight and decided to keep it. I’ve been staring at a photo of this exact pink and white almond look for weeks now, the one with the white tips melting into soft pink and then back to a milky white base. Honestly, it’s the kind of manicure that makes you check your own hands and sigh a little.
In that photo, the nails sit on a hand draped in a white knit sweater with that thick ribbed texture, two silver rings on the ring finger catching the light. The dark gray background makes the shimmer pop even harder. And the almond shape? It does something to the ombre fade that round or square nails just can’t pull off. So let’s talk about how to get this exact look, because I’ve tested the sponge trick, the brushes, the peel-off stickers, and there’s a clear winner.
Why Almond Acrylics Are the Perfect Canvas for an Ombre Fade
Almond nails have that tapered sidewall that naturally guides the eye from cuticle to tip. When you place a gradient on that shape, the color transition follows the curve of the nail like it was designed for it. Square nails make the fade feel abrupt. Stiletto nails make it look a bit aggressive. Almond sits right in the middle, soft but noticeable, elegant but not fussy.
I also think the length matters. In the photo, the nails are long enough to show off three distinct color zones: white at the very tips, pink in the middle, and that soft white base near the cuticle. Short almond nails can still work, but you lose a bit of that dramatic sweep. If you want the full effect, ask for a medium length, something between your fingertip and a full glam set.
Another thing about almond acrylics is how they catch light. The curved surface reflects highlights in a way that makes iridescent shimmer look dimensional instead of flat. You can use the exact same polish on a different shape and it just won’t sing the same way.
How to Match Your Pink and White Shades for a Seamless Ombre
The secret to a believable ombre is choosing shades that actually belong together. A cool-toned pink with a warm white will turn muddy right where they meet. For this look, I’d go with a soft ballet slipper pink, the kind that’s almost nude but still clearly pink, and a bright, clean white. Not ivory, not cream, just a crisp white that doesn’t lean yellow.
You want the middle section to be a true pink, not too pale and not too saturated. Think of the color inside a seashell. Then the tips are white, but not a stark white, more like a soft pearl white that blends into the pink. The base near the cuticle is white too, but sheerer, which is how you get that lit-from-within effect.
Here’s a weird but helpful tip: hold the two polish bottles side by side under a daylight bulb before you commit. If they look like they belong in the same color family, you’re good. If one feels brighter or warmer than the other, swap it for something closer. It takes thirty seconds and saves you from a streaky mess.
Step-by-Step Ombre Nail Tutorial Using a Makeup Sponge
Ok so the method in the Pinterest description is spot on. You need a damp makeup sponge, not a dry one. Dry foam soaks up all the polish and leaves you with nothing. Run the sponge under water, squeeze it out until it’s just damp, and then give it one extra squeeze with a paper towel. That’s the sweet spot.
Paint a thin layer of your white base all over the nail first. Let it dry completely. Then paint a strip of white on one half of the sponge and a strip of pink right next to it, so they overlap just a little in the middle. Press the sponge onto the nail, starting at the tip and rolling slightly downward. You’ll see the color transfer in a soft, messy way. That’s good.
Repeat the dabbing motion two or three times, letting each layer dry for a minute between passes. The trick is to build the color slowly. If you press too hard or use too much polish, you’ll get a hard line where the colors meet. This is where the thin layers matter more than anything. Once you’re happy with the fade, clean up the edges with a small brush dipped in acetone. You can also use a liquid latex barrier around the nail before you start, which just peels off at the end. I never do that because I forget to apply it, and then I’m scrubbing polish off my cuticles like a fool. Anyway, the sponge method works, just give it patience.
How to Layer Iridescent Shimmer Without Overdoing It
Now we get to the fun part. Iridescence can go wrong in so many ways, mostly because people apply too much and end up looking like a glitter bomb exploded on their hands. The key is restraint, but I can’t say “the key is” because that sounds like a robot, so let me put it differently. You want a whisper of shimmer, not a shout.
Use a sheer iridescent top coat with a pearlescent finish, not chunk glitter. Two thin layers over the dried ombre will give you that oil-slick-on-water effect without covering up the pink and white underneath. Another option is to mix a tiny bit of loose iridescent pigment into a clear top coat, but that gets messy and I’ve never gotten the ratio right without either having zero shimmer or turning my nails into full-on holographic mirrors.
In the photo, the iridescence shows up as a soft glow along the edges of the nail, especially where the pink meets the white. That happens naturally when you apply the shimmer top coat evenly, but the almond shape catches the light at different angles. So don’t feel like you need to layer it on extra thick to get the effect. Less really is more here.
The Best Glass-Like Top Coats for a Mirror Finish
Once your ombre and shimmer are in place, you need a top coat that dries hard and shiny. Not a gel top coat that requires a lamp, because you’re already using regular polish with a sponge and that’s a whole different setup. Just a good, fast-drying top coat that levels itself and doesn’t leave brush strokes.
Here are the ones I rotate through depending on my mood:
- Seche Vite for when I need it to dry in five minutes and not smudge when I inevitably bump my hand on the keyboard. It’s thick, but it glides on smooth and gives that glassy, just-dipped-in-resin look.
- Essie Gel Setter if I want a slightly thinner consistency that doesn’t shrink too much at the edges. It takes a bit longer to dry, but the shine is worth it.
- Vibrant Vinyls Fast & Hard for my weirdly specific preference for a top coat that smells like vanilla. Yes, that’s a real thing. It’s glossy and durable, and the smell doesn’t linger, so it’s not as odd as it sounds.
Apply the top coat in one smooth stroke down the middle of the nail, then one stroke on each side. Don’t go back and brush over it again unless you want to drag the ombre around. Let it dry, and then apply one more thin layer if you want that extra cushiony, thick glass effect. Two layers also helps protect the sponge texture from feeling rough.
Common Ombre Nail Mistakes That Ruin the Effect
I’ve made basically every mistake in the book, so this list is hard-won. One of the biggest issues is not letting the base coat dry before you start sponging. If the base is still tacky, the sponge will pull it up and leave bald patches. Wait until the base is fully set, or even use a quick-dry base coat to speed things up.
Another mistake is using too much polish on the sponge. You think more product means more even coverage, but it actually makes the transfer gloppy and uneven. The sponge should look almost dry after you’ve pressed it on twice. If you’re seeing big blobs of color, you’ve loaded too much.
Then there’s the hardware problem. Cheap makeup sponges fall apart when they get wet, leaving little chunks of foam embedded in your polish. I had that happen once and had to pick tiny sponge pieces out of my nail with tweezers. Not fun. Spend an extra dollar on one of those cosmetic wedges that feels like a marshmallow, and you won’t regret it.
Also, don’t skip the clean-up step. Even if you use liquid latex, there’s always some stray polish on the skin around the nail. A pointed cotton swab dipped in acetone works better than a brush for getting into the tiny corners near the cuticle. I know it’s tedious, but a clean edge is what makes the manicure look professional instead of messy.
Pink and White Ombre Variations for Every Season
The pink and white combo from the photo is perfect for spring and early summer, but you don’t have to stop there. Swap the soft pink for a peach or coral in June, and you get a warmer, sun-kissed fade. For autumn, try mixing a dusty rose with a warm cream white. It feels cozier, like a chunky sweater, which literally matches that white knit sweater in the photo I keep referencing.
Winter is where the iridescent shimmer really gets to shine. Keep the pink but add a touch of icy blue at the very tips instead of white. That gives you a frosted, almost snowy look that still feels feminine. And if you’re feeling bold, replace the pink base with a sheer lavender and keep the white tips. It’s still an ombre, still almond shaped, and the iridescent top coat makes it look custom-made.
I’m honestly thinking of trying a red to white ombre for the holidays, but the fade from red to white is tricky because red stains everything, including the sponge, your fingers, and your sanity. Maybe I’ll stick with pink and just add a few tiny crystals near the cuticle for December. That way I get the festive sparkle without the nightmare.
Anyway, the great thing about this sponge method is that it works for any color combo. Once you get comfortable with how much pressure to use and how thin the layers should be, you can Frankenstein together all sorts of fades. Some will be hits, some will be weird, but that’s the fun of it.
If you’re still reading, go pick out a pink and a white, grab a sponge, and give it a shot. The iridescent top coat is the easiest part, so don’t skip it. And when you finish, come back and tell me which color combo you used. I’m always looking for the next one to obsess over.
#iridescentombernails #almondnaildesign #ombrenailtutorial #pinknailideas #nailsart
Leave a Comment