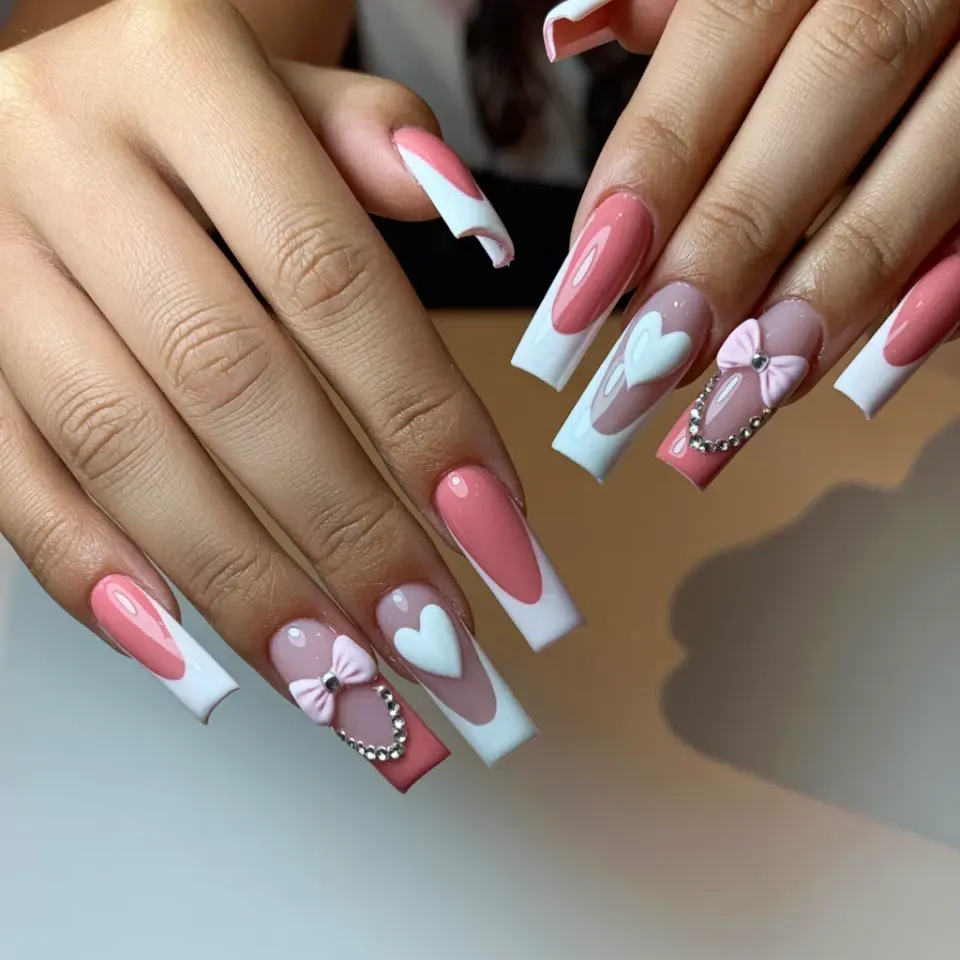
You have seen the photo: long, coffin-shaped acrylic nails with a soft dusty rose base, crisp white French tips, tiny white hearts on the middle fingers, pink bows on the ring fingers, and delicate rhinestones tracing the tip edges of the pointer fingers. It is a dreamy, romantic set that screams “save me for your next appointment.” But getting that exact look is tricky. I have seen too many sets where the dusty rose reads as muddy, the hearts look tilted, or the rhinestones fall off within a week. This article walks through the most common mistakes people make when recreating this long coffin acrylic nails design and how to fix each one before you even sit in the chair.
Choosing the Wrong Shade of Dusty Rose for Your Skin Tone
Dusty rose sounds simple, but it is not a one-shade-fits-all color. In the photo, the base is muted pink with a hint of brown, giving it that vintage, soft look. Many people pick a dusty rose that is either too lavender or too peach, which clashes with the white French tip. If your base pulls too cool or too warm, the whole set looks disconnected.
Ask your nail artist to test a swipe on your bare nail before committing. A dusty rose with a neutral undertone works on most skin tones. If you have a warm complexion, lean toward a dusty rose with a slight terra-cotta base. For cooler skin, a pink with a whisper of gray is better. The goal is a base that makes the white tip pop, not fight it.
Getting the French Tip Curve Wrong on Coffin Nails
Long coffin acrylic nails have a flat, tapered shape, so a standard curved French tip can look awkward. I have seen tips that follow the natural smile line but ignore the straight sides of the coffin shape, resulting in a tip that appears lopsided. The photo shows a clean, straight-across white tip that aligns with the coffin silhouette.
Tell your nail tech to draw the tip edge parallel to the free edge of your nail, not curved like a traditional French manicure. A slight, very gentle arc is fine, but keep it almost horizontal. This makes the nail look longer and more intentional. Also, make sure the white is opaque in two thin coats, not one thick layer that wrinkles.
Positioning Heart Nail Art So It Doesn’t Look Crooked
Heart nail art on the middle fingers is a focal point, but if the heart is off-center or tilted, it distracts from the whole design. In the photo, the tiny white hearts sit dead center on the dusty rose base, symmetrical and neat. The most common mistake is painting the heart freehand without planning, resulting in a blob that looks more like a deformed strawberry.
Use a nail art stencil or a dotting tool to map the two bumps first. Place a small dot for the top left curve, an equal dot for the top right, and a tiny V at the bottom. Connect them with thin strokes. If you want it really crisp, let the white base of the heart dry completely, then outline it with a fine brush and a slightly thicker white polish. This trick makes the heart look polished, not messy.
Adding Pink Bows Without Overpowering the Design
Pink bows on the ring fingers sound sweet, but they can easily become too bulky or lose their shape. The bows in the reference image are small and delicate, with two distinct loops and tails that sit flat on the nail. A common error is making the bow too large or using too much polish, which creates a lump that catches on hair and clothing.
Use a thin brush and a matte pink polish for the bow, and keep the loops tight. Start by painting a small X shape in the center of the nail, then add two small loops on each side. Let each layer dry before adding more. If you are not confident freehanding, use a bow nail decal or a tiny stamp. The bow should complement the heart, not compete with it.
Placing Rhinestones Where They Will Chip and Snag
Rhinestones along the tip edges of the pointer fingers add subtle sparkle, but placement matters. I have seen stones placed right at the very tip edge, which causes them to pop off the first time you grab your phone. In the photo, the rhinestones sit just behind the tip line, nestled in the seam between the dusty rose base and the white tip.
Ask your artist to embed the stones in a small dab of clear builder gel or
#CoffinAcrylicNails #FrenchTipNails #DustyRoseNails #HeartNailArt #NailDesignIdeas
Leave a Comment