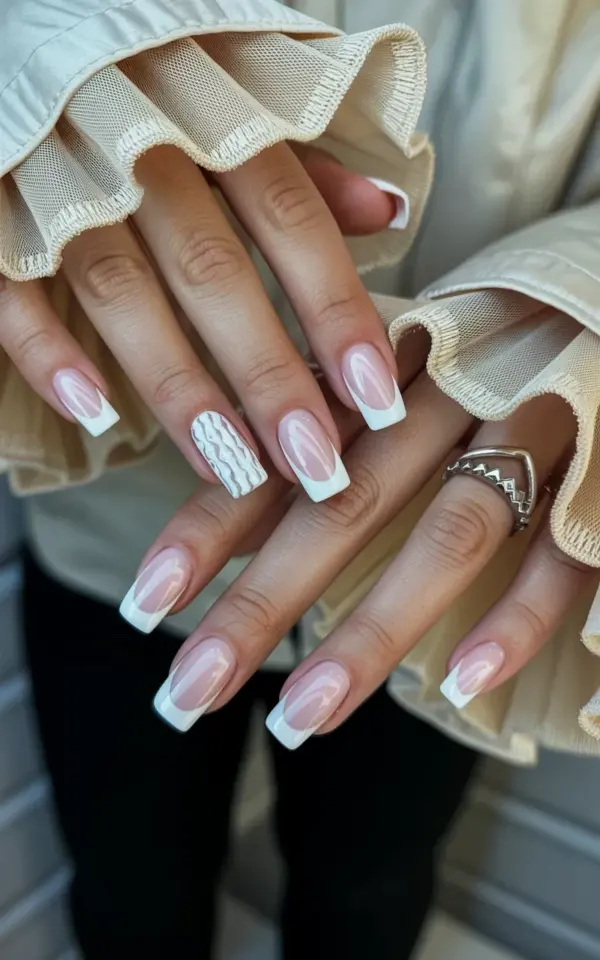
There is something deeply satisfying about a perfectly done set of nails and a quiet, spotless bathroom. You’ve got the soft light, the clean counters, maybe a candle burning nearby, and your hands finally look like they belong in a luxury spa magazine. That’s exactly the energy of a luxury bathroom spa day, and honestly, this spring marble coffin manicure is the perfect companion for it.
The look we’re talking about is soft, almost ethereal. A light pink base, crisp white tips, and one middle finger with a vertical marble texture that catches the light just right. It’s the kind of nail design that makes you want to pour a glass of something cold, run a bath, and ignore your phone for a few hours. If you’re planning your own at-home spa moment or you just want a fresh manicure for the season, here’s exactly how to get this look and make it last.
Why Marble Coffin Nails Are Perfect for a Spa Day Aesthetic
There’s a reason this specific design feels so at home in a serene bathroom setting. The marble texture mimics the calm, natural stone you see in high-end spas and renovated bathroom vanities. When you place a marble-textured nail next to a white mesh fabric or a plush white towel, it just makes sense.
The coffin shape, or ballerina shape if you prefer that name, adds a bit of drama and length without looking over-the-top. It’s elegant, sure. But it also gives you that long, slender finger look that feels so photogenic. Pair that with a light pink base, and you have a manicure that matches the soft, clean aesthetic of a bathroom that’s ready for a long soak.
Gathering Your Nail Art Supplies Before You Start
Ok so before you begin, you need to get your kit together. You can do this with regular polish, gel, or even dip powder, but the process stays pretty much the same. Here’s what you need to have on your vanity:
- A base coat that protects your natural nail from staining.
- A pastel pink nail polish. Something with a milky, sheer quality works best, not a neon or a heavy cream.
- A bright white polish for the French tips, both on the natural nails and the almond or coffin extensions.
- A fine-tipped nail art brush or an old eyeliner brush for the marble veining.
- A silver geometric ring, because honestly, the ring is what sells the whole look.
- Your chosen top coat, either glossy or matte. For this photo, a glossy finish mimics the polished marble look perfectly.
You might also want a small dish of water and a toothpick if you plan on doing a water marble effect. But trust me, the hand-painted vein method looks way more realistic and is less messy, especially when you’re just sitting on the edge of the tub trying to relax.
How to Prep Your Nails for the Perfect Spring Manicure
You can’t get a high-end finish without a solid base. Like, you physically cannot. Start by pushing back your cuticles gently. You don’t need to cut them, just push them back with a wooden stick so the polish has a clean canvas to glide over.
File your nails into that coffin shape by tapering the sides and squaring off the tip. It’s a very specific shape, so take your time with the file. Then, wipe your nails with some rubbing alcohol to remove any oil, dust, or leftover hand cream. This is a step that a lot of people skip, but it makes the polish stick so much better, and it prevents those annoying air bubbles that ruin a good manicure.
Creating the Light Pink Base and White French Tips
Once your nails are prepped, apply that base coat and wait for it to dry completely. If you don’t wait, you’ll get streaks, and nobody has time for that. Then, apply two thin coats of the light pink polish. Let the first coat dry before you even think about touching it with the second coat.
For the white tips, you can use guide stickers or just freehand it. Since this is a spa-day vibe and not a strict classic French, you can keep the tips a little thicker than usual. This gives it a more modern twist. Make sure the line between the pink base and the white tip is clean. If you mess up, dip a small brush in nail polish remover and clean up the edge before you cure or dry the polish.
Mastering the Marble Manicure Texture on Your Accent Nail
This is the non-negotiable step for a marble manicure. On your middle finger, you want to create that vertical ridged pattern. Don’t paint a solid color here, you want to work with the pink base you already have.
Take your fine-tipped brush and dip it into the white polish. Wipe off most of the product. You want just a tiny bit on the brush. Then, draw thin, shaky lines from the base of your nail up to the tip. The lines shouldn’t be straight, they should look like thin veins of stone. Let those lines dry. Then, take a tiny bit of clear polish or a light gray shadow coat and blend the edges just slightly. This gives the effect of depth, like you’re looking into actual marble, not just drawing a line.
Here’s a little tip that took me ages to figure out: less is always more. Start with two or three simple vertical lines. You can always add more, but it’s really hard to take them away once the polish is on.
Accessorizing With a Geometric Silver Ring
A solid block of metal doesn’t really do anything for this look. You need something sculptural. A geometric silver ring, specifically one with sharp lines or a cut-out pattern, adds that instant “high fashion” element. It catches the light and draws attention to the marble texture right next to it.
Slip the ring on your ring finger. It doesn’t matter if it’s sterling silver or just a fun jewelry piece. The sparkle contrast against the matte or glossy pink is what you’re going for. Also, don’t overdo it with the jewelry. Just one piece on the hand is enough. Let the nails do the heavy lifting.
Making Your Spa Day Nails Last Longer
So you’ve spent all this time making your hands look like a marble statue. Now you need to protect your work. Always wear gloves when you’re washing dishes or cleaning the bathroom. I know, it seems weird to say that in a post about bathrooms, but cleaning products are brutal on nail polish.
Apply a quick-dry top coat every three days or so to keep the shine fresh and prevent chipping. Keep your cuticles hydrated with a good cuticle oil. When the skin around your nail is healthy, the whole manicure looks more expensive. And for the love of everything, don’t use your nails as tools to open soda cans or scratch at labels. You’ll just ruin the tips, and you’ll have to redo the whole thing.
The soft white mesh fabric in the background of the photo is actually a clever trick. It makes the pink and white tones pop. If you’re taking pictures of your own manicure for social media, lay your hand on a white towel or a piece of linen fabric. The natural light coming through the fabric will make your skin look brighter and your nail art look sharper.
There’s a rhythm to doing your nails like this, it forces you to sit still and focus on a tiny detail. That’s kind of the whole point of a spa day, isn’t it? You’re taking time to do something for yourself that doesn’t involve a screen or a deadline. So pick your polish, put on some music that isn’t too aggressive, and take your time. Your hands will thank you, and you’ll have a set of spring nails that are ready for any bathroom selfie or brunch date.
Do you have a favorite marble color combo, or are you sticking with the pink and white classic? I’d love to hear how this look turns out for you. Share your results and tag your own version of this cofinnails masterpiece, I’m always looking for new inspo to try next.
Leave a Comment