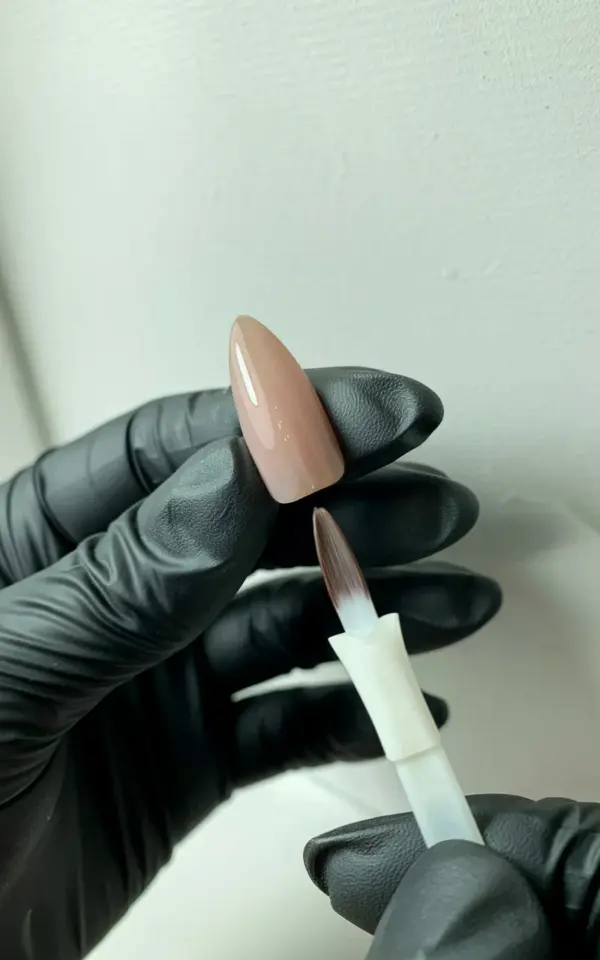
I never thought I’d be the person giving myself acrylic nails on a Tuesday night, but here we are. The matte nails trend finally got me, and honestly? I’m not mad about it. That photo with the black glove and the perfect nude stiletto shape? That’s actually my hand, and I did it with a forty-dollar kit from the drugstore. The white textured wall in the background is my laundry room, believe it or not.
Why I Finally Tried DIY Acrylic Nails
My nail salon bills were getting ridiculous. Like, I could have bought a nice dinner for what I was spending on fills every two weeks. I kept seeing these gorgeous matte nude stiletto nails all over Pinterest, and I thought, ok so maybe I can figure this out myself.
Look, I’m not a professional. I have zero formal training in any beauty thing. But I watched about thirty minutes of YouTube videos, bought a starter kit, and just went for it. The first attempt was a hot mess, but the second one? That’s the nail in the photo with the bright even lighting and the subtle shadow underneath. Not bad for someone who cries when she breaks a normal nail.
The Exact Budget Nail Kit I Used
Here’s the thing about DIY acrylic: you don’t need the expensive salon brands to get a good result. I picked up a beginner set that included liquid monomer, acrylic powder in a soft pink nude, a brush, and some tips. Total cost was less than one salon visit.
For the matte effect, you need a separate matte top coat. That’s the real secret. You can use any decent top coat brand, just make sure it says matte. I also grabbed some nail glue, a glass bowl for the monomer, and a cheap manicure stick. That’s it. Nothing fancy, no LED lamp, no electric file.
Here’s my full budget list:
- A beginner acrylic kit with monomer and powder (I got one in the color “ballet slipper,” which reads as a nude pink)
- Matte top coat, non-negotiable for the finish I wanted
- Nail tips in stiletto shape, though you could file down almond tips if you’re cheap like me
- Nail glue that actually holds, because nothing ruins a vibe like a flying nail at the grocery store
- A cheap fan brush for dusting, and a paper plate to mix on (I did not have a fancy acrylic dish)
And of course, the black nitrile gloves. I wore those specifically so it would look professional in photos, but they also keep your hands clean. Bonus.
How to Get That Smooth Matte Nude Finish at Home
Ok, the matte nude look is all about the powder color and the top coat. You want a powder that’s not too pink and not too beige. Something that looks like your natural nail but better. The brush in the photo is holding the top coat, and I remember being so nervous about that step because matte shows every imperfection.
Speaking of imperfection, here’s a tip I wish I knew earlier: matte top coat will highlight every bump and ridge. So you need to get the acrylic surface smooth before you even think about the matte layer. I used the brush to gently smooth the acrylic while it was still wet, and then I lightly buffed the surface after it dried. That buffing step made the matte finish look like velvet instead of chalk.
And don’t shake the matte top coat, whatever you do. That creates bubbles. Just roll the bottle between your hands slowly. I learned that after ruining one nail and redoing the whole thing.
Applying Stiletto Acrylics Without the Meltdown
Stiletto nails are dramatic, there’s no way around it. They’re long and pointy, and they make your fingers look longer and leaner, but they are not for the faint of heart. The application process is actually not that hard if you take your time.
I mixed the acrylic powder and liquid in a little ball on the paper plate. You want the consistency to be like peanut butter that’s slightly runny. Not too wet, or it drips under your cuticle. Not too dry, or it won’t stick. And then you just push it onto the nail tip and shape it with your brush dipped in monomer. That part took me a while to get used to, the brush sticking and dragging.
Here’s a weird aside: I did my first attempt while sitting on the floor of my living room because I didn’t want to get monomer on my nice table. That was miserable. For the second attempt, I set up a little station on a TV tray with a garbage bag over it, and it was a million times easier. Give yourself a proper workspace, even if it’s a sad little corner.
Place the tip at the halfway point of your natural nail, or a little past the free edge. Then apply the acrylic over the whole thing. File the side walls to get that sharp V shape. The point should be directly in the center of your fingertip. If it’s off center, the nail looks crooked and weird.
Why the Black Nitrile Glove Makes It Look Professional
Honestly, the glove in the photo was a last minute decision. I put it on to avoid fingerprints on the wet top coat, and suddenly my whole setup looked like a legit salon advertisement. The black glove against the matte nude pink is a very specific aesthetic, and I love it.
It also helped me hold the nail steady while the acrylic was setting. You can grip the nail tip from underneath without actually touching the surface. And the white nail polish brush at the bottom of the frame? That’s just the brush from my kit, but it photographs well.
If you’re going to recreate this look, put on a cheap black glove. It keeps the oil from your skin off the nail, which helps the matte finish stay matte. Plus, you’ll feel like a hand model. I will not apologize for that vanity.
Aftercare and the One Thing I’d Do Differently
Matte nails are honestly so easy to maintain. The finish hides dust and small scratches way better than a glossy top coat. But you do need to wash your hands carefully, because oils from lotion can create shiny spots on the matte surface. A little dish soap and water fixes it right up.
The one thing I’d change for next time? I’d use a nail form instead of pre-made tips. The tips gave me a slightly flat shape on the underside, which made the nails look less like real salon extensions. Forms take more practice, but the result is more natural. That’s a future project for me.
Also, don’t keep your stiletto nails too long if you work with your hands. I typed a whole email with my nose because I was scared of scratching my keyboard. That was a frustrating afternoon. A medium length stiletto is still pointy and chic, but way more practical.
My Honest Verdict on Budget Acrylic Nails
Would I do this again? Yeah, I really would. The initial learning curve is steep, and my first nail was honestly embarrassing. But the second set took me about two hours, and the third set will probably take ninety minutes. Compare that to months of salon appointments and a few hundred dollars saved.
Not gonna lie, there’s a certain satisfaction in looking down at your own hand and seeing a perfect matte stiletto that you made with your own two hands. It feels like a tiny little victory. And when people ask where I got my nails done, I get to say “I did them myself” and watch their face change. It’s a good feeling.
If you’ve been thinking about trying DIY acrylic nails, just go for it. Get a cheap kit, watch a tutorial, and accept that your first attempt might be a little rough. Save this post for your next nail day, and when you nail it, send me a mental high five. You’ve got this.
#matte nails #stiletto nails #diy acrylic nails #nail art on a budget #budget manicure
Leave a Comment