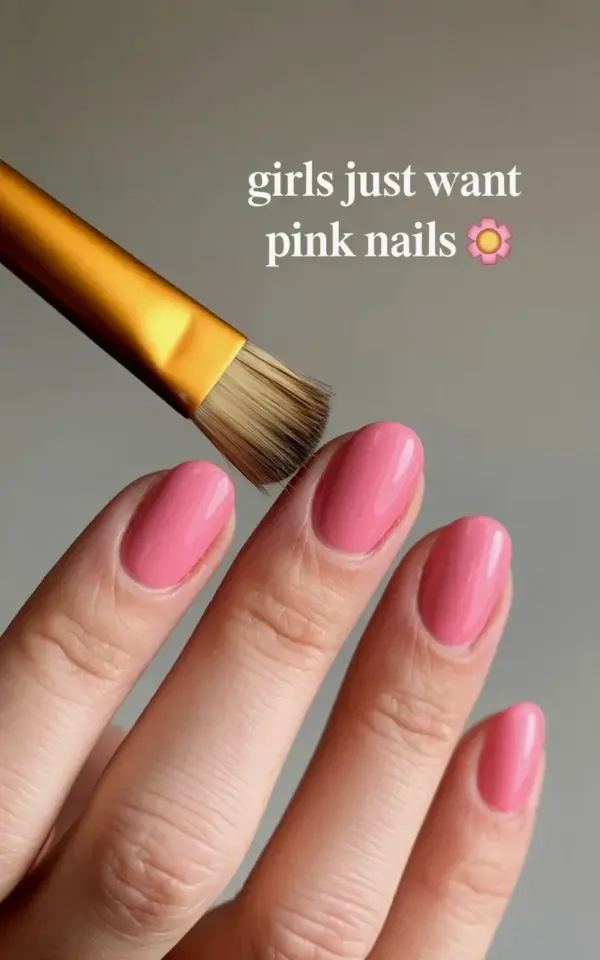
I have a confession to make. For years I was a gloss-only nail person, convinced that anything matte would just look dull or unfinished. Then I saw this exact manicure, the soft matte pink with a gold brush resting just at the tips, and I completely changed my mind. The full mattepinknails transformation is honestly pushing me to book an appointment for oval nails right now. It’s not loud, it’s not flashy, but it has this quiet confidence that glossy polish just doesn’t always deliver. Save this one for your next trip to the salon because it’s the kind of look that photographs beautifully and feels even better in person.
Why Oval Nails Make Matte Pink Look Different
Here’s the thing about the oval shape. It bridges the gap between round and almond so perfectly. Round nails can sometimes make your fingers look shorter, while almond tips might feel too sharp for everyday wear. Oval is the Goldilocks option.
The photo captures long, oval-shaped nails painted in that uniform matte pink finish. That shape catches the light differently than a square or coffin edge would. Instead of sharp corners reflecting brightness, the soft curves just absorb the light. The result is a smooth, almost velvet-like look that reads as expensive and minimal.
If you have naturally strong nails, this shape is forgiving. If you don’t, you can absolutely achieve it with builder gel or acrylic overlay. But the key thing, the reason this works so well, is the way the oval edge mirrors the curve of your cuticle. It creates a symmetry that’s really pleasing to the eye.
The Before: What You Need Before You Start
Look, the “before” in the photo isn’t shown. But we all know what a typical before looks like. Stained nails, dry cuticles, maybe some peeling at the edges, or just old chipped polish that needed to go three days ago. I’ve been there more times than I care to admit.
Before you even think about applying that perfect matte pink, you need to prep the canvas. This isn’t optional. A matte finish has zero shine to hide behind, so every lump and bump in your natural nail will be on display. Here’s what I do:
- Push back cuticles gently with a wooden stick, do not cut them if you can avoid it.
- Buff the nail surface to remove any ridges, but don’t overdo it or you’ll thin out your nails.
- Wipe each nail with rubbing alcohol or pure acetone to dehydrate the plate completely.
- Apply a thin base coat and allow it to dry fully. This prevents staining and helps the color stick.
Honestly, the prep work takes longer than the actual painting sometimes. But it’s the difference between a manicure that lasts five days and one that lasts two weeks. I learned that the hard way after a particularly bad chipping incident right before an event. Never again.
How to Apply Matte Pink Polish at Home
Ok so you have two routes here. You can use an actual matte pink polish in one bottle, or you can use a matte top coat over any regular pink shade you already own. I prefer the top coat route. It gives you way more flexibility if you decide later you want a glossy week instead.
Start with thin coats. I mean painfully thin, like barely-there streaks. With matte polishes, thick layers tend to dry unevenly and develop patches where the texture looks almost chalky. Three thin coats will look infinitely better than one thick gloopy layer.
Wait for each coat to dry before adding the next. Matte finishes show settling lines if you rush. And whatever you do, do not use a quick-dry spray with matte top coat. I have no idea why, but it completely ruins the effect. It leaves weird shiny spots that are impossible to fix without starting over.
The After: Working With the Matte Finish
The after is where this nailtransformation really shines. In the photo, that gold brush touching the nails adds a subtle contrast. It’s just a casual touch, but it highlights how smooth the matte surface really is. The brush looks like it could glide right off the nail.
That light gray background in the photo does a lot of heavy lifting too. It makes the pink feel softer and more muted, almost washed out in the best way. A bright white background would have made the pink look harsher and more of a statement. The gray keeps it gentle.
When you’re done, step back and look at your hands in natural daylight. Not bathroom lighting, real daylight. You’ll notice the matte finish makes the color look lighter than it does in the bottle. Matte polishes dry down a shade or two lighter because they don’t have that glossy depth. If you want a true dusty rose, go one shade darker in the bottle than what you actually want on your nails.
And that gold brush detail? You can recreate that vibe at home with a cuticle oil pen. A quick swipe of shimmering oil along the tips mimics that soft glow without the mess of an actual brush.
How to Keep That Matte Look Alive
Let me be real with you. Matte nails are high maintenance. They show every fingerprint, every drop of hand cream, every tiny speck of dust. It drives me insane sometimes, but the payoff is worth it.
Use a matte top coat that specifically says “no wipe” or “one step”. These are designed to dry directly to that velvet finish without needing to be wiped with alcohol. Other top coats can end up looking patchy or streaky after they settle.
Reapply a fresh layer of top coat every two or three days. You don’t have to redo the whole manicure. Just add a thin layer on top and it refreshes the matte effect, hiding any oiliness from your natural skin. Carry hand sanitizer in your bag, but use it before you touch your nails, not after, because it can eat through the polish.
Ways to Wear Matte Pink With Other Colors
This particular look is uniform, all one color, no accents. That’s the beauty of it. But if you want to mix it up for your next appointment, there are a few routes you can take. The matte pink base works well with glossy accents. Do matte pink on every nail but add a glossy top coat on the ring finger. The contrast between the two finishes is subtle but noticeable.
You could also add a single gold line down the center of each nail. Use a thin striping brush and a metallic gold polish, then go over it with the matte top coat to seal it in. That gives you the gold brush aesthetic from the photo without having to actually hold a brush near your hands.
Final verdict? The ovalnails trend is getting all the attention right now, and this matte pink adaptation is honestly one of the best manicureideas I have seen in a long time. The beforeandafternails difference is night and day. The before is tired, the after is quiet luxury. If you decide to try it, let me know how it goes. I’m currently deciding between this exact shade and a slightly deeper mauve.
#mattepinknails #nailtransformation #ovalnails #manicureideas #beforeandafternails
Leave a Comment