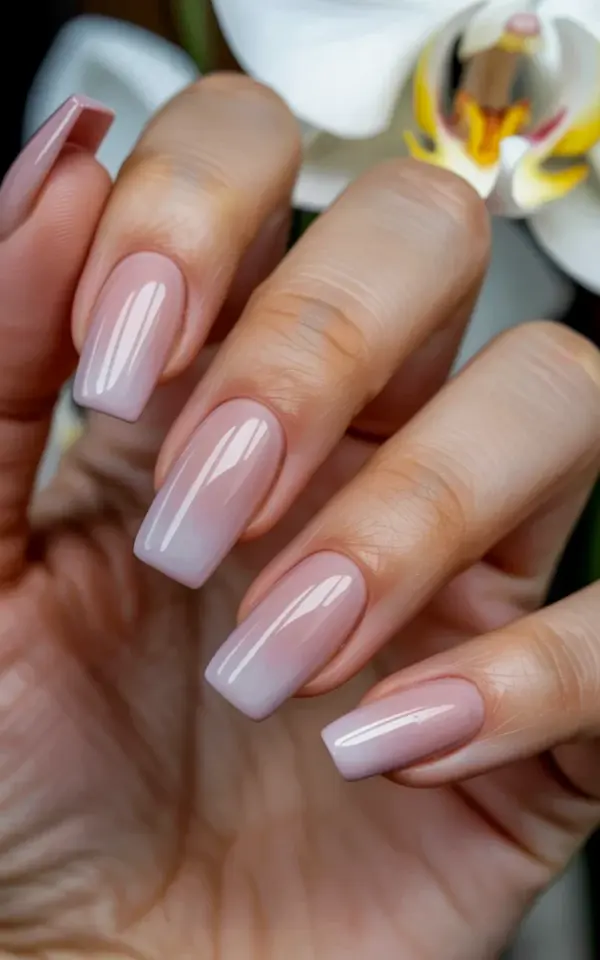
You’re staring at your new set of nude ombre coffin nails and something feels off. The fade is harsh, almost like a stripe got painted across each nail, and the whole look screams DIY in a way you didn’t intend. I made this exact mistake two months ago, and honestly, it cost me a good seventy bucks for a result I hated. Nude ombre coffin nails sound simple, but the margin for error is brutal. The secret isn’t the polish or the nail shape, it’s the blending. Without a soft, gradual transition, your acrylics will look like a failed art project instead of a polished, expensive manicure.
The photo I saved before my appointment showed exactly what I wanted. Long coffin shaped acrylics, about three inches in length, with deep mauve tips that dissolved into a soft pink base. The finish was glossy enough to see a reflection. It looked flawless. My nail tech nodded when I showed her the reference, then proceeded to give me a gradient that stopped blending halfway up the nail. The deep mauve just sat there, heavy and unblended, creating a hard line against the pink. I paid for that lesson, and now I’m sharing it so you don’t have to.
Why Most People Mess Up Their Nude Ombre Acrylics
Look, the biggest issue is almost always the airbrush or sponge work being rushed. A true ombre needs the color to melt into the next one, not just fade from dark to light in two visible steps. When you’re working with acrylic, the powder dries fast, which gives you maybe ten seconds to blend before it sets. That is not a lot of time.
The other problem is color choice. A deep mauve tip needs a pink base that actually matches the undertone of the mauve. If your base is too warm or too cool, the transition will look muddy. My original set used a pink that pulled too peach, and the whole nail looked dirty from certain angles.
Here are the specific mistakes I see over and over in salon chairs:
- Using a makeup sponge that is too dry to pick up the acrylic color properly
- Painting on thick layers that create a ridge where the colors meet
- Forgetting to cap the free edge, so the tip looks flat and dusty
- Skipping the clear gloss top coat, which murders the whole effect
The Bridal Pink Base Trick for a Cheaper DIY Set
I’m not gonna lie, salon rates for a hand painted ombre are steep. Most places near me charge an extra fifteen to twenty dollars for the gradient effect on top of the acrylic full set price. That adds up fast when you need a fill every two weeks. So I started experimenting at home with drugstore polishes, just to see if I could achieve the same look for less.
Here’s what worked, and it’s almost stupidly simple. I used a milky pink base coat from a brand that costs under six bucks, let it dry completely, then used a small piece of latex free sponge to dab the deep mauve color onto just the tip area. The key (sorry, but it is the key) is to dab, not swipe. Swiping drags the color down in streaks. Dabbing builds the pigment slowly and lets you control exactly where the fade begins.
After a few attempts, I got a gradient that honestly rivaled my salon set. It saved me about forty dollars, which I immediately spent on takeout. But the real hack? Doing the ombre in acrylic form requires a different method than polish. You have to work in thin layers, letting each one cure partially before adding the next shade. It’s tedious, but it prevents that harsh line every single time.
How to Get Salons to Blend Your Acrylics Properly
If you’re not trying to DIY your nails, you need to know how to talk to your nail tech so they actually listen. Just saying “ombre please” is too vague. You need to be specific. Tell them you want a gradient that starts fading at the halfway point of the nail bed, not just at the cuticle area. Explain that you want the deep mauve to be concentrated only on the last quarter of the tip.
Ask to see the sponge or brush they plan to use before they start. A clean, slightly damp sponge is ideal. If they pull out a dry, crusty one, request they swap it. I know it feels awkward to micromanage, but you’re paying for a service. And if you mention the word “seamless,” most techs will understand you know what you’re talking about.
Also, bring a physical reference photo, not just a description. Pull up that photo of the nude ombre coffin nails with the white orchid in the background and point to exactly where the transition happens. Visual aids remove any guesswork. The long nails in that photo have a distinct fade that starts just past the middle, which is a safe baseline for most hand shapes.
Affordable Products That Actually Deliver a Smooth Fade
You don’t need a professional airbrush kit to get this right. I’ve tested a bunch of budget options, and a few stand out. For the base pink, a jelly or sheered out regular polish works better than a full coverage creme. It lets the natural nail or acrylic tip show through slightly, which creates depth.
For the deep mauve, try a gel polish that you can wipe off and redo if the blend goes wrong. Regular polish dries too fast to fix mistakes, and acetone on acrylics is a disaster. Gel gives you that working time, and a basic UV lamp costs less than your salon visit.
My current trio is a drugstore jelly pink for the base, a mid-range mauve gel for the tips, and a high shine top coat that I apply twice. The combination costs around thirty dollars total and lasts me six or seven manis. That is real money saved. And please, avoid those cheap no-name acrylic kits from Amazon that come in a plastic bag. I bought one once. The powder clumped, the liquid smelled like a chemical spill, and the nails looked like chewed gum.
Oh, and one weird thing that helped me? Blending with my eyes half closed. Squinting blurs the harsh line and lets you see where the color actually feels heavy. Sounds crazy, but it’s like looking at a painting. Step back, squint, assess, adjust.
Maintaining That Glossy Finish On a Budget
Once your nude ombre coffin nails look right, the battle is keeping them looking wet and glossy. The biggest offender is dry cuticle oil buildup, which dulls the shine. Use a fast drying oil, not a thick balm, and apply it only to the skin, not the nail plate.
Reapply a clear top coat every three to four days to keep the gloss level high. You do not need a fancy brand. A quick dry top coat from the drugstore will work, just make sure to wrap it around the tip to seal the edge. That also prevents the mauve from chipping off the end, which ruins the whole ombre illusion.
Another budget trick: keep some hand cream in your bag. Acrylics look ten times better when the hands around them are hydrated. Dry, cracked skin draws attention away from your nails and makes even a perfect gradient look meh. The photo inspiration with the orchid has soft, flawless skin, and it makes the nail aesthetic work. Fake the glow with a cheap hand mask if needed.
I also learned to stop picking at my cuticles, which is a hard habit to break. It’s not just about pain, it’s about the untidy edges ruining your clean line. If you have a snag, clip it, don’t rip it. Ripping fucks up your cuticle skin and leaves a rough patch that catches on everything, including your top coat.
Realistic Nail Length Considerations and Daily Life
Let’s talk about those three inch nails in the reference photo, because they are impractical as hell for most people. I wore a similar length for a week and typing on a keyboard became a literal chore. I had to learn to type with the pads of my fingers, and even then, I hit the wrong keys constantly.
If you’re a server, nurse, or hairstylist, do yourself a favor and request a slightly shorter coffin shape. You can still get the nude ombre effect and the tapered sides, just at a length that doesn’t interfere with your job. A medium coffin, around two inches, still photographs beautifully and feels much easier to manage.
But the shape matters more than the length. Coffin nails have straight sides that taper to a narrow, flat tip. If your nail tech files them too rounded, they just look like wide oval nails, and the ombre loses its sharpness. Make sure those sides are parallel right up until the last few millimeters before the tip.
One thing I didn’t expect was how hard it is to open soda cans with long nails. I used the side of my index finger to hook the tab, which works, but it puts pressure on the acrylic. I broke one nail that way, right at the stress point near the tip. Keep an emergency nail glue in your purse if you’re prone to breakage, it’s a lifesaver.
So my advice is to prioritize the blend over everything else. The perfect nude ombre is 70% prep and blending technique, 20% the right colors, and 10% a glossy top coat. Most mistakes happen because the gradient is rushed or the colors clash.
Anyway, I’d love to know how your next set turns out. Drop a comment below if you try the squint trick, or if you have a better budget hack for blending acrylics, I’m all ears. And seriously, save that orchid photo as a reference, it will save you a trip back to the salon for a fix.
Leave a Comment