Why Most Pink and Gold Coffin Acrylic Nails Look Cheap (And How to Fix It)
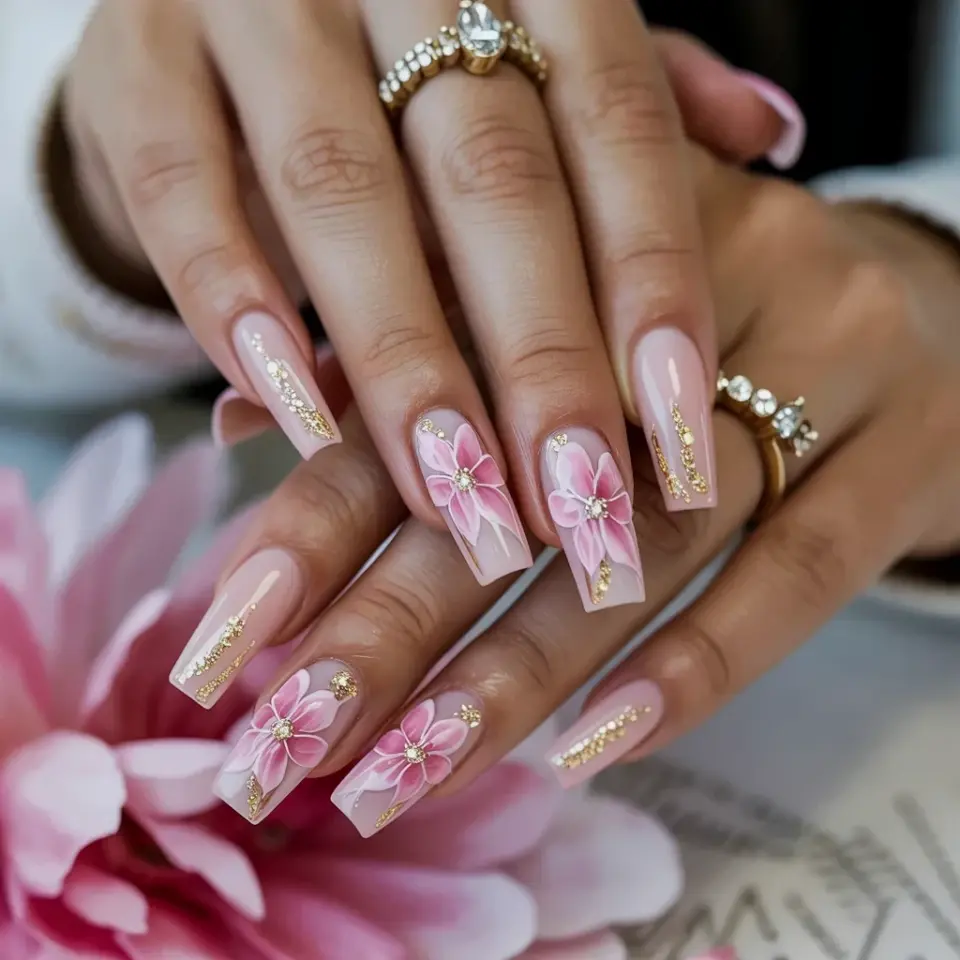
If you have been scrolling through Pinterest for nail ideas, you have definitely seen a set of pink and gold coffin acrylic nails with floral designs. That exact combo of soft pink, hand-painted flowers, and gold glitter accents is everywhere. And honestly, it is easy to mess up. I have made every mistake in the book, from picking shades that clash to drowning the nails in rhinestones until they look like a disco ball. But when you get it right? That look from the photo (long coffin acrylics in soft pink with delicate flowers, gold sparkle, and tiny rhinestones catching the light) is pure magic. Today I am walking you through the common mistakes so you can skip the trial and error and go straight to a manicure that actually looks expensive.
Mistake #1: Picking the Wrong Shade of Pink for Coffin Acrylic Nails
The biggest trap people fall into is choosing a pink that is too bright or too cool. A neon or bubblegum pink will fight with the gold accents and make the whole design look costume-y. In the photo that inspired this article, the base is a soft, muted pink. Think of a dusty rose or a ballet slipper shade that leans slightly warm. That undertone lets the gold glitter and flowers pop without screaming for attention.
If you are doing these at a salon, bring a reference photo (like this one) and ask for a nude-pink or a barely-there blush. Avoid anything with blue undertones if you are using warm gold. Test the polish on one nail first. You want the pink to be a quiet background, not the loudest element.
Mistake #2: Overloading Gold Glitter and Rhinestones
Gold glitter accents are gorgeous, but more is not better. The mistake I see constantly is people covering the whole nail in chunky glitter or sticking rhinestones on every single finger until the design loses focus. In the photo, the glitter is used sparingly: a few gold specks near the center flowers and small rhinestones scattered just enough to catch the light. The result is elegant, not gaudy.
- Gold glitter tip: Use a fine glitter top coat only on the center of the nail or as a thin gradient near the cuticle.
- Rhinestone rule: Stick to one or two tiny stones per nail, placed near the flower stem or at the base. Avoid using them on every nail equally.
- Pro trick: Press the rhinestones into wet top coat and seal with another layer. That keeps them from falling off after three days.
Mistake #3: Hand-Painted Flowers That Look Like Blobs
Delicate floral designs are the star of this look, but they can go wrong fast if the artist uses too much paint or has a shaky hand. The flowers in the reference photo have thin, defined petals with a tiny gold dot in the center. They are positioned right in the middle of each nail, which creates symmetry and balance. If your nail tech freehands thick petals, the flowers can look muddy and overpower the soft pink base.
My advice: ask for 3 to 5 small petals per flower, no bigger than a pea. Use a fine detail brush. If you are doing this yourself at home, practice on a fake nail first. And remember, less paint on the brush equals cleaner lines. You can always add more, but you cannot undo a goopy mess.
Mistake #4: Ignoring the Shape and Length of Coffin Acrylic Nails
Coffin shape is tricky. The mistake is letting the sides flare out too wide or making them too pinched at the tip. The ideal coffin taper is gradual, starting about halfway down the nail bed. In the photo, the nails are long (around 3 to 4 inches) but not extreme. That length gives enough canvas for the floral details without being impractical. If you go shorter than 2 inches, the flowers will look crammed. If you go longer than 4 inches, the nails can look like talons.
Also, check the apex (the bump of acrylic over the cuticle area). A low apex will cause the nails to break. A high apex looks unnatural. Ask your tech to build a smooth, slight arch. And make sure the tip is squared off just a tiny bit, not sharp. That is what makes coffin shape read as chic instead of aggressive.
Mistake #5: Forgetting About the Ring and Accessories
You might think the jewelry does not matter, but it does. In the photo, a gold diamond-encrusted ring sits on the ring finger. That ring picks up the same gold tones from the glitter and rhinestones. If you wear a silver watch or a chunky plastic ring, it will distract from the nail art. The mistake is not coordinating your accessories. This is a warm-toned look (pink and gold), so stick with gold jewelry, warm stones, and minimal pieces.
If you plan to wear this design to a special event, bring a photo of your actual ring to the nail appointment. That way the tech can place the nail art to frame your hand. For example, you might want the most rhinestones on the ring finger to match a statement ring.
Mistake #6: Skipping Nail Prep and Aftercare
Long coffin acrylics with intricate floral designs are an investment. The biggest mistake is skipping proper nail prep. If the cuticles are not pushed back and the nail plate is not dehydrated, the acrylic will lift within a week. You will lose those pretty flowers and gold accents fast. Also, after you get them done, avoid using your nails as tools (opening soda cans, scraping labels). That chip or break will destroy the design symmetry.
Here is a simple aftercare list:
- Apply cuticle oil twice a day to keep the acrylic flexible.
- Wear gloves when washing dishes or cleaning.
- Get fills every 2 to 3 weeks to prevent lifting.
- Use a glass nail file to smooth any rough edges (metal files can crack acrylic).
Mistake #7: Rushing the Drying or Curing Process
Whether you use gel polish or traditional acrylic with top coat, rushing leads to smudging and dullness. The gold glitter and rhinestones need to be sealed properly. I have seen people leave the salon too early and ruin their delicate floral nail designs because the top coat was not fully hardened. If you are using UV gel, make sure each hand cures for the full 60 seconds, not 30. For acrylic with a brush-on top coat, wait at least 10 minutes before touching anything. And no, blowing on them does not help.
A good tip: bring a book or scroll on your phone while you wait. Do not drive for at least 30 minutes after the appointment. Heat from the sun or car steering wheel can soften fresh gel.
Final Thoughts on Pink and Gold Floral Coffin Nails
This style is timeless for a reason. The soft pink base, delicate hand-painted flowers, and gold glitter accents work together to create a manicure that feels both romantic and luxurious. The small rhinestones that catch the light? That is the detail that turns a good set into a great one. Avoid the mistakes I laid out here, and you will end up with nails that people actually stop you on the street to compliment. I have seen it happen. Next time you head to the salon, take this article with you (or at least the photo description) and talk through each step with your nail tech. Want more nail inspo like this? Drop a comment with your favorite flower shape, and I will share my top picks for DIY floral nail art tools. 💅✨
#PinkNails #GoldNailArt #CoffinAcrylicNails #FloralNailDesigns #NailInspo
Leave a Comment