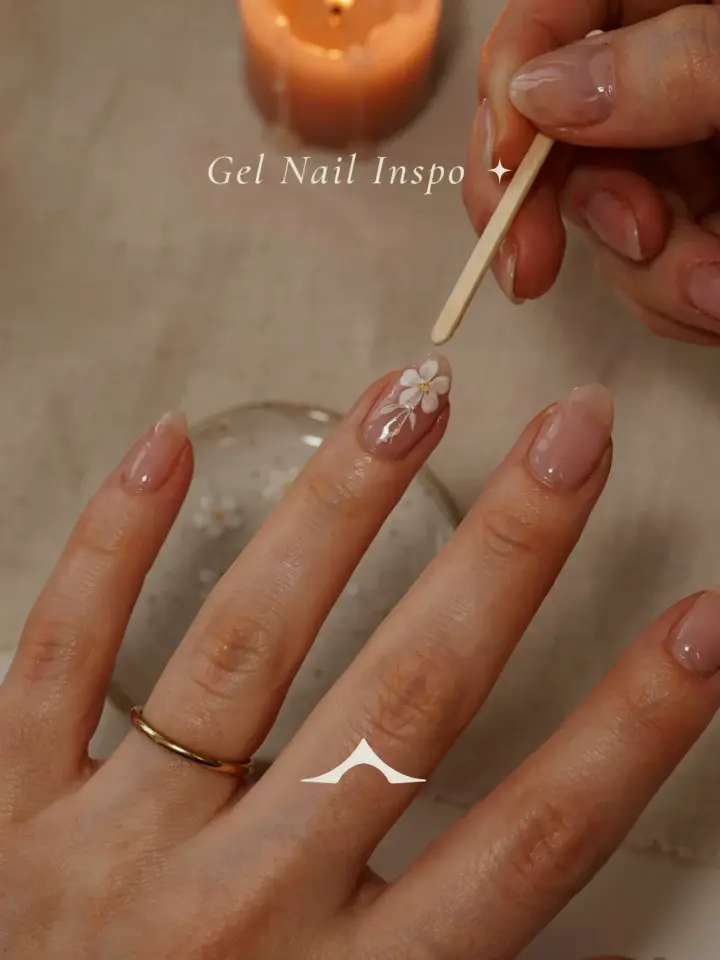
Spring French floral nails are having a real moment this year, and the best part is you don’t need a single fancy tool to pull them off. Armed with a toothpick, a base polish, and a steady-ish hand, you can create those tiny, delicate daisies over a classic french tip without leaving your kitchen table. It’s the kind of manicure that looks like it took an hour at a salon, but honestly, you can knock it out in twenty minutes while the kettle boils.
Forget the intricate brushes and the expensive dotting kits. The toothpick is the unsung hero of the DIY nail art world, and it deserves your attention. It gives you the control to place a microscopic dot exactly where you want it, and then you can use that same dot to pull a petal outwards. Here’s the thing: the slight imperfection of a toothpick actually makes the flowers look more organic, more like real wildflowers rather than stamped decals. Let’s get into how you can master this spring manicure at home, because that fresh, floral look is way too pretty to leave to the professionals.
### Toothpick Nail Art: Why It Works So Well
Look, I’ve tried the fancy striping brushes. I’ve attempted the thin liner brushes that cost more than my lunch. But when it comes to painting a daisy the size of a pea, nothing beats a wooden toothpick. The point is fine enough to be precise, but it has just enough drag to catch the polish and pull it into a petal shape. It’s also disposable, which means no soaking brushes in acetone to clean them, a chore that honestly, I despise.
The magic lies in the absorption rate. The wood soaks up a tiny bit of the polish, which actually prevents you from depositing a giant blob onto your nail. You get a controlled, almost dry application that is perfect for building up dots and layers. It’s forgiving, too. If you mess up a petal, you can just dab it away with your fingertip before it dries, no harm done. Plus, it cost you about two cents to replace, so there is zero pressure to get it right on the first try.
### How to Prep Your Nails and DIY Dotting Tool
Before you start dodging the dog hair that always seems to float into wet polish, you need a clean canvas. Push back your cuticles gently and give your nails a quick buff to shine them up. A swipe of rubbing alcohol or nail polish remover on each nail ensures there is no natural oil left behind, which is the number one reason polish peels off by Wednesday.
Now, for your setup. Grab a toothpick, a piece of scrap paper or a paper plate, and a paper towel. Pour a tiny puddle of your chosen polish colors onto the paper plate; this is your palette. Letting the polish sit out for just a minute or two thickens it slightly, which is actually what you want for dotting. If the polish is too fresh and runny, the dots will spread out like a puddle, so let it get a little tacky.
### Step-By-Step: Spring French Floral Nails at Home
Ok so, let’s talk about the actual spring manicure application. You are going to start with your base color, something sheer and soft. A milky pink or a soft peach looks incredible against the white of the french tip, honestly. Apply two thin coats of your base and let it dry completely. Do not rush this step. I have ruined so many manicures by being impatient and smudging everything a minute later.
Once your base is dry, it is time for the french tip. Instead of using guides, you can freehand it, but if you are shaky, those sticker guides are a lifesaver. Dip your toothpick into your white polish and dot the smile line at the tip of your nail. Then, using the side of the toothpick, drag the edge across to fill in the line. It’s a slightly messy technique that keeps the edge imperfect, which feels very modern for spring.
Now for the fun part, the spring floral accent.
1. **The Center Dot:** Dab a dot of yellow or gold polish in the corner of your nail, near the cuticle or at the side of the tip.
2. **The Petals:** Load your toothpick with white polish. Start at the edge of the yellow dot and drag the toothpick outward, lifting up as you go to create a tear-drop petal. Repeat this in a circle. You only need five or six petals for a daisy.
3. **The Placement:** Don’t put a flower on every nail. It looks too busy. Paint a full daisy on your ring finger and thumb, and then just put tiny, single dots on the other nails to assemble a vine or a scattered pattern.
4. **The Vines:** Using the thinnest point of the toothpick, drag a hairlines curve of green across the base of the nail for a stem. Add a couple of tiny leaves by dotting green and then dragging the toothpick sideways to smudge it slightly.
### Nail Polish Colors for the Perfect Spring French Tips
Choosing the right colors is half the battle for this trend. White tips with red flowers are fun, but they feel a bit Ladybug, if you know what I mean. We are going floral, not insect. For a very timely take, consider a “glazed donut” base, that pearly, shimmery white essence, with soft lilac or butter-yellow flowers.
Alternatively, go the whimsigirl route. That aesthetic is huge right now, and it translates perfectly to nails. Use a sheer ballet pink base, stark white tips, and then add daisies that have a slight orange or chartreuse center. Honestly, just matching the flowers to the two colors in your favorite spring dress is the way to go. You cannot go wrong with a classic: the white french tip, the pale pink base, and the yellow-centered white daisies. It’s timeless.
### Common Toothpick Nail Art Mistakes to Avoid
It’s not all smooth sailing in the world of toothpick painting. I have made every single mistake in the book so that you don’t have to. The biggest issue people run into is using too much polish on the toothpick. You just want a tiny fleck on the very end; if it’s dripping or gluggy, wipe it on the paper plate first.
Another issue is painting over a base coat that is slightly tacky. If you press down too hard with the toothpick, you will dent the base color. Use a feather-light touch, and let the weight of the tool do the work. And look, if you have a shaky hand like me, brace your pinky finger against the edge of your coffee mug or the table while you paint. It steadies your whole hand. Try not to paint too close to the cuticle, it makes the nail look shorter and messier.
– **The “Gravity” Mistake:** Holding your hand up to look at it while it dries. Gravity pulls the wet polish downwards, warping your perfect dots.
– **The “Fresh Paint” Trap:** Tipping the bottle straight from the bottle to the nail. Use the palette. Always. It changes the game.
– **The “One Coat Wonder” Lie:** You will need two to three passes with the toothpick to get the opaque white petal look. Don’t try to do it thick in one go, it will smudge.
### More Easy Spring Manicure Ideas to Try
If daisies aren’t your speed, or if you want to practice with the toothpick a bit more, there are plenty of other spring manicure variations born from the same technique. You can create a gorgeous lilac “blossom” tree by painting a brown trunk with your toothpick on a corner, then dotting a cluster of pink and white dots above it. It’s so easy and looks like a watercolor painting.
You can also mimic the look of a French tip using just polka dots. Forget the white tip; simply place a row of small white dots along the curve of your free edge. Trust me, it’s way easier to keep clean and looks equally polished. Or, for a more fresh take, try using mint green tips and dotting a tiny white daisy in the center of the nail. The contrast between the pastel and the crisp white is very “light and airy,” perfect for a garden party or even just a sunny trip to the grocery store.
### Sealing the Design and Keeping It Fresh
So you’ve spent the last twenty minutes carefully crafting your little floral garden. Now, protect it. A good topcoat is non-negotiable here. You need a glossy topcoat that will smooth over the raised dots of your flower petals, making the surface uniform and shiny. Swipe it on carefully. Try not to go over the same spot three times, or you will start to drag the petals.
I like to use a fast-drying topcoat because I am clumsy and always hit my nail against the fridge handle on the way to the couch. When it comes to sealing the tips, make sure you run the brush along the very edge of the nail. This “wraps” the color and seals it, which means your spring French floral nails will last longer without chipping. Nobody wants to lose a daisy to a sink full of dishes the very next morning.
### Final Thoughts on Your Spring Manicure
This is genuinely a low-stakes, high-reward way to spend an evening. You might ruin your first nail or two while you are trying to figure out the angle of the toothpick, and that’s totally fine. It’s just polish, it comes off with a wipe of remover, so there is no excuse not to try. Look, once you get the hang of dragging that little wooden stick through a bead of polish, you will feel like an absolute nail wizard.
Keep it simple. Start with just one accent daisy on your ring finger and the rest of the nails solid pearl. Save this for a weekend when you are feeling creative, make yourself a cup of tea, and give it a shot. You might just discover that your new favorite nails are the ones you made in your pajamas. Let me know if you try the toothpick trick, I am always happy to hear about your little nail victories (or hilarious smudges).
Leave a Comment