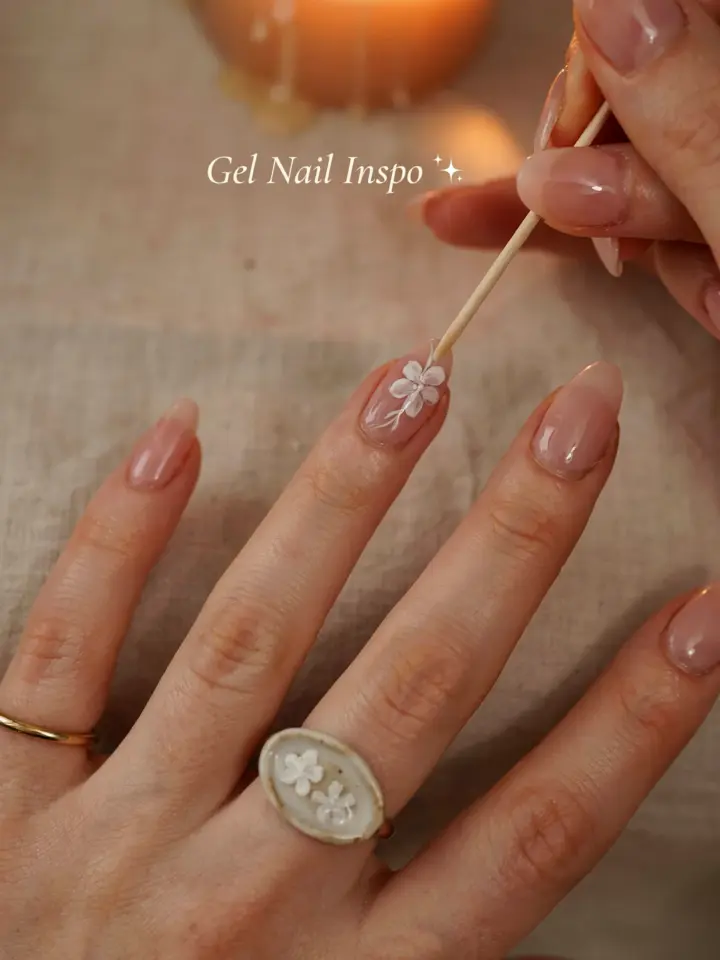
Last spring, I kept seeing gorgeous floral French tips all over my feed, but I assumed they required expensive brushes or stamping kits. Then I discovered I could create delicate Spring French Floral Nails using nothing fancier than a wooden toothpick and my regular gel polishes. The technique saved me money, gave me full control over each petal, and made my manicure feel custom and intentional. If you have steady hands and a little patience, this is the most beginner friendly way to try floral nail art at home.
Why the Toothpick Technique Works for Gel Nail Art
I tried tiny dotting tools and fine liner brushes, but the angle always felt off for those tiny petals. A toothpick has a natural point that mimics the tip of a detail brush, but it also has a slight flexibility that helps you lift the gel cleanly. Because gel polish stays wet under a lamp until cured, you can reposition a petal or wipe the toothpick clean and start over. I like to use round, wooden toothpicks because they absorb just enough excess polish to prevent blobs. The key is not to overload the tip, a single dab of gel is usually enough for one small flower.
Another advantage is cost. A box of toothpicks costs less than a dollar and you can use each end once, then toss it. No cleanup, no brush cleaner, no worry about staining bristles. For a spring floral set, I used two toothpicks total, one for white petals and one for the yellow centers.
Gathering Your DIY Floral Nail Supplies
Before you start, collect everything you need. I keep my supplies in a small tray so I don’t have to hunt for things while my gel is wet. Here is my exact list:
- Base coat and top coat (I prefer a rubber base for grip)
- Soft pink or nude gel polish for the French tip background
- White gel polish for the floral petals
- Yellow or pale peach gel for the flower centers
- Green gel for tiny leaves (optional, but I love it)
- Wooden toothpicks (round, not flat)
- Lint free wipes and isopropyl alcohol for cleaning mistakes
- UV or LED lamp with a cure time you trust
That is genuinely all you need. I used a sheer milky pink for the base because it makes the white flowers pop without being too stark. If you prefer a more traditional French look, use a clear or barely tinted base.
Step by Step: Creating a Spring French Base
Start with clean, shaped nails. Apply a thin layer of base coat and cure it. Then paint two thin coats of your chosen sheer pink or nude, curing fully between coats. For the French tip itself, I like to use a white gel that is slightly thicker than my base color. I paint a freehand smile line, but if that feels tricky, you can use a French tip guide sticker. I actually prefer a slightly uneven, hand painted line because it looks more organic with the floral details later.
After curing the white tips, I wipe off the tacky layer with alcohol. This helps the floral gel stick exactly where I want it without dragging. Do not cure the flowers until you are happy with the placement. Gel stays wet under the lamp, so you can take your time, even ten minutes if needed.
How to Paint Tiny Flowers with a Toothpick
This is where the magic happens. Dip the tip of a fresh toothpick into your white gel. You want a small bead, about the size of a pinhead. Touch the bead onto the nail at the edge where your French tip meets the sheer base. Gently pull the toothpick outward to create a teardrop shape. I do five teardrops in a circle for each flower, leaving a tiny gap in the center. The petals do not need to be identical; slightly uneven shapes look more like real spring blossoms.
Once the petals are done, I use a clean toothpick to dab a tiny dot of yellow gel right in the middle. I gently press and lift to leave a small round center. If I want leaves, I use a toothpick to drag a thin line of green gel outward from the flower base. Two small strokes done. Cure the entire nail for the recommended time, usually 30 to 60 seconds depending on your lamp.
I usually place two to three flowers on each accent nail, and maybe one small bud on the others. Do not overcrowd; negative space makes the floral details stand out.
Common Mistakes to Avoid with Gel Floral Details
The first time I tried this, I used too much gel on the toothpick, and the petals spread into blobs. Less is always more. If your bead seems too large, wipe the toothpick and start again. Another issue is curing too soon. I once cured a nail before adding the centers, and the yellow dot sat on top of the cured white, leaving a bump. Instead, keep all the wet gel on the nail until you finish all flowers on that finger, then cure once.
Do not forget to wipe the sticky layer after curing the flowers if you plan to add a top coat. Gel top coat over a greasy surface can lift. I always do a quick wipe with alcohol, then apply a generous layer of top coat, ensuring it flows around the raised petals. Cure, and you are done.
My Spring Color Palette Picks for Floral French Nails
I have tested several color combos and these are my spring favorites. For a soft look, pair a milky white French tip with pale pink flowers and butter yellow centers. For a bolder spring feel, try a sheer lavender base with white flowers and a tiny orange center. My personal go to is a baby blue base with classic white flowers and mint green leaves. It reminds me of forget me nots in a garden.
If you work with gel, you can mix colors on the nail easily. A toothpick is small enough to let you blend a tiny bit of white with a speck of pink to create custom petal shades. I have done that by dipping the toothpick into both colors before placing the bead. The marbling effect inside each petal looks subtle and expensive.
Making Your Manicure Last Through Spring
Floral details add texture, which means they can chip more easily if not sealed properly. I apply two thin coats of top coat rather than one thick one. The first coat sinks around the petals and locks them in place. Cure it, then apply a second coat for gloss. I also cap the free edge of each nail with top coat, brushing along the tip to prevent lifting. With gel and good prep, my floral French manicure easily lasts two weeks.
I avoid soaking my hands in hot water for the first 24 hours after curing, and I wear gloves when washing dishes or gardening. This sounds basic, but it really makes a difference with raised nail art. If a petal starts to snag, a tiny dot of clear gel cured over it can smooth it out again without ruining the look.
Creating Spring French Floral Nails with a toothpick turned out to be one of the most satisfying DIY nail projects I have tried. The process is forgiving, the tools are cheap, and the results look delicate and intentional. I hope you give it a shot for your next spring manicure. If you enjoyed this walkthrough, save it to your Pinterest board so you can find the steps easily when you are ready to paint.
#SpringNails #FrenchNails #FloralNails #DIYNailArt #GelNails
Leave a Comment