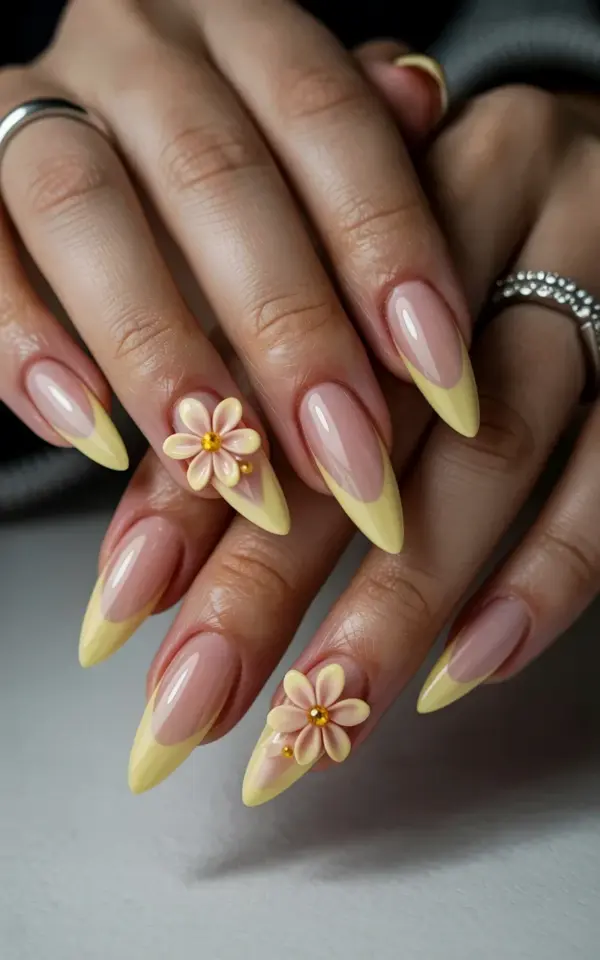
The first thing you notice about a set like this isn’t the length. It’s the color flow, that soft, buttery yellow melting into a pink so pale it almost looks like the nail is glowing from the inside. I’ve seen hundreds of gradient sets, and honestly, most of them are ruined before the polish even touches the brush. This guide is for anyone about to request these stiletto acrylic nails at the salon, because I can guarantee you, the technician will do something wrong unless you know what to ask for. Let’s talk about the five biggest mistakes people make with this exact yellow-pink 3D floral design, and how to walk out with nails that actually match the photo.
Mistake #1: The Base Starts Too Dark (Fixing the Yellow to Pink Balance)
The photo shows a pale yellow at the cuticle, not a lemon yellow and not a mustard tone. Most salons will grab the first yellow they see and slather it on, which completely kills the dreamy effect. The trick here is asking for a sheer yellow base, something with a milky quality, and then building the color intensity only toward the middle of the nail.
And here’s the thing: the pink at the tip needs to be equally soft. Do not let them use a hot fuchsia. The entire gradient from yellow to pink should feel like a whisper, not a shout. A good test? If the transition takes up more than two thirds of the nail, it’s wrong. The gradient should sit right around the midpoint, leaving that buttery yellow to breathe at the base. Honestly, the amount of times I’ve seen this ruined by a heavy hand is insane.
Bullet List: What To Say To Your Nail Tech
Print this, screenshot it, or just memorize it before you sit down in that salon chair.
– Ask for a sheer, milky yellow at the cuticle, not opaque.
– Insist that the pink fades in slowly, with at least 4 passes of the sponge or brush.
– The gradient line should be soft, no harsh border visible.
– Tell them to cap the free edge with a clear top coat, not pink, to keep the pale gradient look intact.
– If they start blending too fast, stop them early and ask for a lighter touch.
Mistake #2: The 3D Flowers Clash With the Nail Shape
Stiletto nails are long, dramatic and sharp. The 3D flower nail art has to be scaled to match that. Most people make the mistake of using a flower that’s too big, which crowds the narrow tip and looks like a decoration fall on the nail. In this photo, each flower is delicate, placed near the cuticle area or mid-sculpture, leaving the tapered point completely visible. The ratio here is 60% bare nail, 40% decoration. That’s the golden rule.
Also, placement matters more than size. The flowers in the source photo sit with the pale pink petals angled slightly toward the tip, not facing straight up. This creates a sense of movement during any type of wrist flick, and honestly, it makes the nail look longer. Ask your tech to position the 3D flower below the midline but above the smile line (if you have one), because placing it too low will just cover up all that beautiful gradient work.
Mistake #3: Attaching 3D Flowers With the Wrong Glue or Gel
This is a structural issue, not just an aesthetic one. A 3D flower falls off when it’s popped onto the nail with runny glue. The correct method, and the one used on these stiletto acrylic nails, involves placing the flower onto a small bead of clear builder gel, then curing it. This little gel dome anchors the petals and prevents them from catching on your hair or clothing. I’ve lost count of how many clients come back with a missing flower and blame the tech, but honestly, it’s because they didn’t prep the surface.
The back of the 3D flower needs a tiny bit of roughness. If it’s factory-smooth, nothing will stick for long. A quick file of the back of the flower, a swipe of primer, and then the gel bead creates a weld, not just a sticker. And please, make sure that tiny yellow rhinestone center is set while the gel is still uncured. Pressing it in afterward just leaves a visible gap that gathers dirt.
Mistake #4: Forgetting That the Gradient Needs a Glossy Seal
This is a long nail, and long nails show imperfections in the finish. The glossy top coat on the reference image is doing a lot of heavy lifting. Without it, 3D flower nail art looks dusty and cheap, like old costume jewelry. You want a high-shine, non-wipe top coat, and it needs to be applied in two thin layers, not one thick one. The second layer should cover the 3D flower petals themselves, but here’s the warning: you must dry the flower area separately with a small brush to avoid pooling around the rhinestones.
That pooling is the enemy. It creates a weird, cloudy crater right in the center of the flower, and suddenly all anyone sees is that defect instead of the design. If your salon uses a thick gel top coat, ask them to use a thinner viscosity one for the 3D elements. The dark gray background in the photo is there for a reason, it makes that glossy depth pop. Too much top coat will actually flatten the 3D effect and make the petals look like stickers.
Mistake #5: Having Zero Plan for The Nail Length
Everyone sees the long stiletto shape in the photo and thinks “yes, that.” But then they sit in the chair and let the tech freehand an extreme length without considering their actual lifestyle. The nails in the reference photo are extremely long, and they have to be, or the gradient gets lost. A short stiletto nail doesn’t have enough canvas for a yellow to pink fade to feel smooth. It just looks like two separate colors smushed together.
If you want this exact look, you have to commit to the length. And I mean really commit. Typing becomes a muted tap, picking up a coin becomes a precise operation, and get ready to use your knuckles for anything involving a keyboard shortcut. I once wore a set this long and almost dislocated my thumb trying to clip my seatbelt, so keep a nail kit in your bag at all times. If you’re not willing to adapt your grip, ask for a shorter almond shape with the exact same 3D flower gradient design. It will still look gorgeous, just with a different silhouette.
The Real Secret: It’s About The Negative Space
So much of this design is about what the tech *doesn’t* do. They don’t cover every nail with a massive flower cluster. They don’t add extra gold foil or swirls or rhinestones all over the cuticle. The entire design is centered around restraint. The tiny yellow rhinestone in the middle of each pale pink flower is the only bling, and that’s enough. This is actually a very wearable set, if you count “wearable” as dangerously long and fiercely sharp.
The next time you save a photo like this, or mention the keywords floral nail art to your technician, remember that the power is in holding them to that specific visual standard. Show them the picture, zoom in on the negative space, and point out how far the flower is from the cuticle. Most designs like this get ruined by over-delivery, adding too much stuff until the original concept is buried.
How to Keep The 3D Flowers Alive (Maintenance)
These are not one-week nails, they can last for a month if you treat them right. But a 3D flower will snag on a sweater and rip at the seam, which is painful and annoying. You need to be deliberate with how you move your hands. Use the pad of your thumb for everything, never the edge of the nail. And after you wash your hands, dry *under* those flower petals, because moisture trapped under the 3D element will breed fungus and lift the nail acrylic.
Use a soft, clean eyeshadow brush to sweep away any dust after a long day. Also, bring your own cuticle oil. The tech usually has some standard brand, but the good stuff, the one that soaks into the cuticle around stiletto acrylic nails without leaving an oily residue, is worth investing in. Swipe it around the base of the flower daily, because cracked cuticle skin around a 3D design ruins the entire look.
Anyway, nail art inspiration like this is meant to be personalized, not just copied. Take the yellow to pink gradient, take the 3D flower with the yellow rhinestone center, and make it yours. If you want a slightly longer flower stem or a different petal shape, just ask. A good artist will guide you, but they can’t read your mind. And trust me, you’re going to get so many compliments on these, but the best part is how you feel when you catch your hand moving in the light and that glossy finish catches the sun. Go ahead and save a pin, send it to your salon, and please, don’t let anyone talk you into that thick yellow base.
Leave a Comment